The following information about how to shoot a Smith & Wesson revolver comes from Burning Powder by Lt. Col. Douglas B. Wesson. Burning Powder is also available to purchase in print.
While this subject has been discussed in many large books, the writer believes that it can be covered thoroughly in a comparatively few pages, provided the reader will permit himself to use his imagination as well as his intelligence.
Long experience in shooting instructions has led to the development of the following method, which has been proven to produce excellent results with surprisingly short periods of instruction and practice. The fundamentals of this method can be stated very briefly: it is based upon Stance, Posture and Mental Control, which sounds like a radical departure from old accepted methods, but actually covers the entire situation with the fewest possible words.
Stance
If you will stand erect with your feet together, looking straight forward at some object on the wall and close your eyes, you will find shortly that you begin to sway backward and forward. If you will now turn 90° to the left and stand in the same manner, but with your head turned over your right shoulder, your face in the same direction as before, and with your eyes still closed, you will again find this tendency to sway, although, of course, in relation to the object, you are swaying sideways. This is a condition that we meet in shooting and is the easiest of all difficulties to correct, “body sway.” Were you holding a revolver in your hand as you were faced originally, you can see that the revolver would rise and fall in relation to the target as you swayed; resulting in high or low shots in actual shooting; when standing at right angles to the target the revolver would be moving to right and left, which would result in horizontal dispersion of your shots. To find the stance to obviate to the greatest extent this body sway, it is simply a matter of going through the original experiment as described above, first standing with your eyes closed until you feel yourself beginning to sway directly facing the target, then turn your body 90° to the left, still with the face in the same position, and await the same sensation. Now, with the eyes still closed and the head motionless, place your feet where you feel the least tendency to sway in any direction. This will be your proper stance, and it may vary from directly facing the target with the toes turning in, to the rear foot actually crossed in back of the forward foot.
The majority of shooters will find that their steadiest position will be at approximately a 45° angle to the target and the forward foot slightly turned in. The distance between the feet may prove to be anywhere from a few inches to a couple of feet, but in general somewhere between 10 inches and 15 inches will be found best.
Posture
Posture is without doubt of greatest importance in shooting, and, as will be seen later, is directly connected with mental condition.
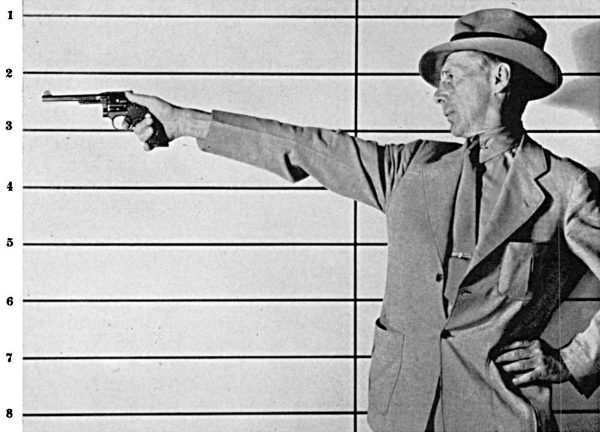
After having taken what you have found to be your proper stance, stand in front of the target with the feet correctly placed and the arms hanging limply at the sides; rotate, (or pronate) the shooting arm so the palm of the hand is towards the target and raise your arm from the shoulder, keeping the arm itself absolutely limp with the hand drooping at the wrist. Notice how with the palm up and all muscles relaxed the fingers are half closed; it would require a decided effort to straighten them. This in itself will take some practice, and until you are convinced that there is no muscular tension whatsoever in the arm, below the big shoulder muscles, continue to stand there merely raising the arm from the shoulder and holding it there for 5 or 10 seconds. (If you are doing it properly you will find that the elbow is actually at the full extent of its joint action, the arm must not be bent at the elbow in the slightest). The hand will dangle at the wrist limply and can be shaken by moving the whole arm with the shoulder muscles. Now that you have fully assured yourself that the arm and wrist are absolutely limp, roll the hand and forearm over (in golf this is known as pronating) until the thumb points at the target. Here again test by shaking the whole arm for absolute looseness of the wrist; you should be able to make the hand flop as loosely as the end of a fly swatter. By this time you are without any doubt feeling mighty uncomfortable in your elbow joint; that is as it should be, and this discomfiture is only overcome by practice, and is due to the fact that except in shooting, your arm is very seldom held for any length of time without the support of the muscles. Here the load is entirely on the tendons and they must become strengthened by use. Standing or sitting, the one exercise can be practiced with great benefit to your scoring, and you will soon find that it will be possible to hold the arm straight out supported by the big shoulder muscles, wrist limp and thumb pointing steadily at the target for several minutes at a time without the slightest sensation of fatigue or pain. One Instructor of the writer’s acquaintance holds his arm out in that manner, when on long drives alone, with a box of .38 cartridges in his hand, and he has developed his arm to the point where he can hold a .38 S&W revolver in shooting position for over half an hour without great fatigue.
Here comes the high point in Posture. You’re standing there with your shooting arm raised from the shoulder, all muscles limp and the thumb pointing at the target, your other arm hanging as loosely from the shoulder. Now slump, and when we say “slump” we mean just exactly that. Think of a soldier standing at attention and be as much different as possible, loosen up the muscles of your neck so your head will droop; naturally, as you are looking at the target it will tend to droop in that direction, let your belly muscles sag, let your shoulders drop, see how much shorter you can make yourself by relaxing every possible muscle in your body; you’ll find it to be 2 inches or so if you honestly and utterly slump. You are now standing on your bones, even your feet should feel flatter and closer in contact with the floor than usual. Just to be sure that you are slumped as much as possible, swing your left arm around until the back of the hand is in contact with your body somewhere in the neighborhood of the right buttock, and push forward with it slightly to see if you can’t sag a little more, and for your final effort in obtaining a complete slump, open your throat and exhale through your mouth so you can be heard. This, if done properly, will absolutely relax the muscles of the diaphragm; and it actually is the diaphragm that is responsible for muscular tension throughout the body.
It won’t be easy at first to obtain this complete relaxation that we insist upon; in fact, not only is it somewhat difficult, but you will in all probability feel extremely foolish when doing it, but remember, when you do succeed, you have the one proper position that will enable you to do your best scoring. It is perfectly true that many high scorers obviously shoot under great tension, but it would certainly be much easier for them should they learn to relax, and in long matches lessening that tension would result in still higher scores.

Position Of Weapon In The Hand
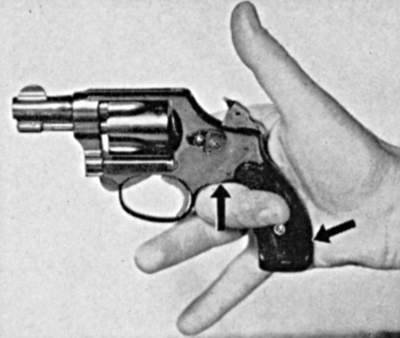
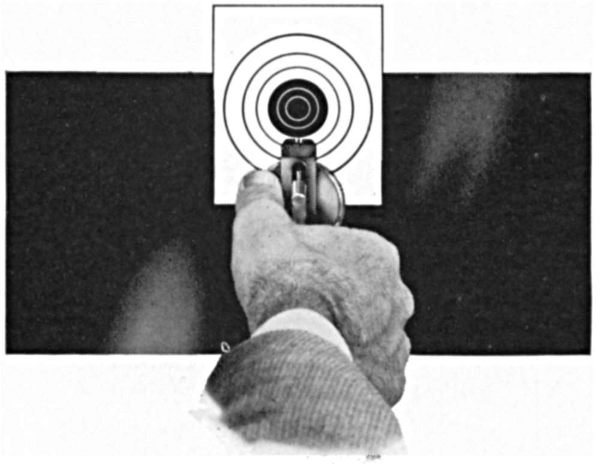
The importance of the method of holding the weapon cannot be over-emphasized, as here again utter relaxation is the prime requisite. If, when you are standing with the thumb pointed at the target as previously described, a person were to lay a revolver in your hand, you would have naturally the Perfect Hold; the weapon supported by the second finger and the base of the hand. As is shown in the illustration, no other vertical support is required, and this is as true shooting the tremendously powerful S&W “.357” Magnum as the K-.22; as a matter of fact, as the power of the arm increases the more essential a light hold becomes to minimize the recoil.
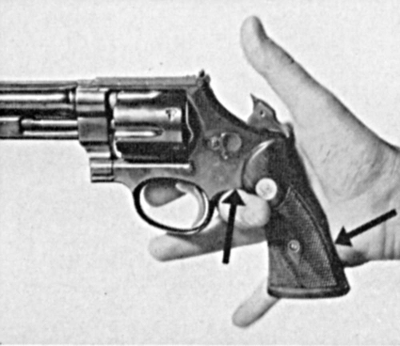
The thumb is straight and pointing in the direction of the target, resting lightly against the top of the side of the frame, thus giving one point of horizontal support. The trigger finger extends through the guard and is in contact with the edge of the frame in rear of the trigger, giving the second and opposing horizontal supporting point. Note by the illustration that the trigger finger is as straight as possible, not hooked around the trigger as might seem natural. A most important point to observe is that the weapon and the arm form a straight line, which means that the supporting point on the second finger is on, or slightly forward of, the second joint. If an angle is formed by the weapon and the arm, not only is the recoil taken on the thumb joint instead of being distributed over the entire fleshy part of the hand, which with large calibered weapons can be extremely painful, but also the trigger finger tends to get away from the frame, hook on the trigger and will produce a hammer release such that the trigger finger follows through and brings the trigger abruptly to the end of its travel with a shock that causes the barrel to droop and a resulting low hit on the target.
Hammer Let-Off
The foregoing most naturally and easily brings us to the matter of hammer let-off, or as it is commonly referred to, “trigger squeeze,” a word that tends to form a false impression in the minds of the shooters. So much has been written about this one particular point that it has resulted in its assuming a most unnecessarily important place in the comparatively simple matter of holding a revolver and discharging it with the object in mind of hitting the point desired.
If one holds the gun as described and exerts a gradually increasing pressure on the edge of the frame with his trigger finger, where it makes contact directly back of the trigger, in a somewhat downward and sideways direction, keeping the finger as nearly straight as possible, it will result naturally in an increasing pressure on the trigger, and eventually that pressure will be sufficient to permit the hammer to fall. As the pressure has been exerted on the frame, there will be no tendency whatsoever for the finger to continue its travel, and there will be no “follow through” of the trigger or trigger finger that would cause the trigger to come abruptly to the end of its travel and cause a jar or slap which might cause the muzzle of the gun to drop. If you try this carefully, you will note that as the sideways pressure on the frame with the finger is increased, there is a very natural and almost unconscious increase of the pressure exerted by the thumb on the opposite side of the frame in the opposite direction; in fact, if you will again assume proper posture, without the revolver and with the thumb pointing and the arm limp and move your trigger finger slightly in, you will notice a tendency of the thumb to move in the opposing direction; it might be called a scissors action.
Another extremely interesting method of accomplishing the hammer release that has been used in instruction work with most excellent results is to hold the arm as described, and then disregarding the finger entirely, attempt to shove the thumb forward at the target. This will induce a contraction of the trigger finger that is definitely involuntary, and again the hammer will be released without jar, or any signs of follow through after the instant of release.
Some shooters, and excellent scorers too, have added devises to their arms to limit the travel of the trigger after the hammer has been released; others resort to springs to cushion it. It is obvious that if the tendency to pull through the hammer let-off with sufficient force to disturb the point of aim exists, any mechanical adjustment will but reduce the effect, it cannot correct it.
Sighting
You may consider it somewhat surprising that up to this point we have concerned ourselves entirely with the actual handling of the arm; you will be inclined to ask what all this instruction amounts to unless the arm is properly pointed. The answer is simple; if the Stance, Posture and Hold are correct, the thumb will steer the revolver into approximately the correct position, and a hit will be made somewhere in the vicinity of the target; in fact, you have already the basis of so-called hip shooting, which actually means any shooting done with the weapon below the level of the eye. The best possible alignment of sights with an improper trigger let-off, or without the benefit of proper stance and posture, cannot produce consistent hits.
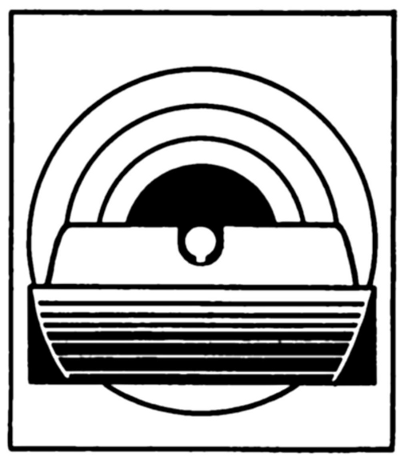
The principles of sighting are simple and are based upon the idea that three points establish a straight line; the three points involved are: the rear sight, front sight, and object to be hit. The rear sight in most common use in target shooting is the square notch, and the front sight the square post, as illustrated; these are known as the Patridge sights and were first brought into popularity by a shooter of that name. The great advantage of these sights is the ease with which they can be aligned by the shooter, as the broad flat top surface of the front sight forms a straight line with the flat top of the rear sight slide for proper elevation, and the front sight as seen in the square notch of the rear sight with equal bands of light on each side for proper windage.
At this point it is well to spend a considerable length of time holding the revolver in shooting position with the proper stance and posture, and practice simply aligning the front and rear sights and releasing the hammer, as instructed, with no target or aiming point in mind. When you can successfully release that trigger time after time and the hammer drops with no disturbance whatsoever of the front sight in the rear sight notch, you are then well on the way to being a successful hand-gun shooter.
With a properly designed target arm with the Patridge or Post front sight, it is excellent practice to lay a dime flat on the front sight, hold the gun in shooting position and release the hammer; when you can effect this hammer release properly, the dime will remain undisturbed on the front sight after the hammer has fallen. This feat can be accomplished even with the S&W “.357” Magnum revolver with its 8 3/4 inch barrel; you will soon find that the shorter the barrel the easier the accomplishment.

There are two methods of aiming, the 6 O’clock and the Dead Centre hold. The 6 O’clock hold is in by far the widest use by target shooters, particularly with the Patridge type sight, and here, with the front and rear sights in proper alignment, the revolver is held so the target appears as in the illustration. You will note that a slight line of white is seen above the sights; were this not so, it would be difficult for the shooter to determine whether the sight was exactly at the bottom of the bull, or more or less actually in the black. The amount of white to be seen will vary tremendously with the individual shooter, some wishing to see the barest possible amount, and others a full inch or more.
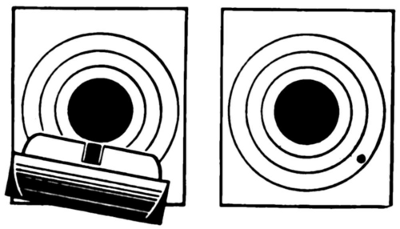
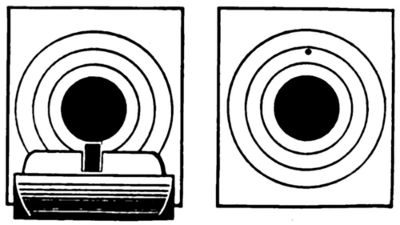
The second method in more common use in outdoor, or field shooting, is the dead centre hold, and for this hold the bead sight is much better adapted. In this case with the sights properly aligned the bead is held directly on the point to be hit.
The ordinary U notch is in the shape of a half circle of slightly larger or equal diameter to the bead, but we have found that a “deep U” gives us better results. In this the “U” is of sufficient depth to make the top of the bead come level with the top of the rear sight slide when properly aligned, which makes for more positive elevation than if the top of the bead is somewhat above the top of the slide.
It is actually a matter of individual choice as to what type of sights and what method of holding is selected.
Getting Off The Shot
We have now covered all the necessary preliminaries, and it is time to actually burn a little powder.
Your target is in place and you are on the firing line with your loaded revolver. With your revolver properly held in your shooting hand, cocked and blocked with the opposite hand (as elsewhere described) assume the stance that you have found to be proper; incidentally, you very probably will find that this stance will vary slightly from day to day, which is only natural, as no person can coordinate identically the same at all times. Now rest your revolver on the bench before you, should there be one, or if not, let it hang with your upper arm resting on your body in such a manner that the revolver is pointing a foot or so beyond your forward foot, assume your proper posture, and remember to SLUMP to your fullest slumping ability. To help you, open your throat and let out your breath; raise your shooting arm and revolver rather slowly directly in the line of the target, and, as the revolver comes to the level of the bottom of the target, you will find the front and rear sights coming into alignment. Maintain that alignment first, last and always, and keep the revolver coming up slowly. For the last few inches of travel you can raise the revolver not with the muscles of the arm, but by actually letting the body set back from the waist, and as the revolver is coming up, the trigger finger is increasing the pressure sideways and downward on the edge of the frame directly back of the trigger. A perfect combination of raising the revolver and increasing the pressure with the trigger finger will result in a hammer release occurring at the exact instant that the sights have arrived at a point just below the bull, and the whole time required from the start of the revolver on its upward travel to the discharge of the shot will be somewhere in the vicinity of four to five seconds. The maximum length of time advisable in getting off the shot is seven seconds, for after this the revolver begins to waver; no man can ever develop sufficient steadiness to hold a revolver motionless on the mark. It is true that you see many men who make excellent scores with hand-arms holding on the mark for as much as twenty to thirty seconds, but the fact remains that the first hold is the best hold, and the longer one takes in getting off a shot, the more difficult the succeeding shots become.
Too much emphasis cannot be placed upon keeping the front and rear sights in alignment. Let that be your main objective; it should be obvious that with the proper alignment of sights the point of aim might be from one side of the bull’s-eye to the other and yet a black shot would result, while an improper alignment can result in a most disconcertingly wide shot, although all other conditions were perfect.
Breathing
You will probably have noticed that we have omitted in our instructions all reference to breathing, with the exception of the rather casual remark that in order to assure yourself of complete relaxation the throat should be opened and air expelled from the lungs audibly. If you succeed in getting the complete relaxation, or slump insisted upon, and get the shot off as described, the matter of breathing, or holding your breath, or locking the throat, is of absolutely no importance whatsoever and the thought will not even occur to the shooter. As a matter of actual fact, this is one of the points that can be eliminated entirely in our simplified method of shooting instructions; in the language of the poet, “forget it.”
Here is a chart, first published by us almost twenty years ago, that has been widely copied, and which shows the results that can be produced by apparently satisfactory holds, but with improper alignment of the front and rear sights.
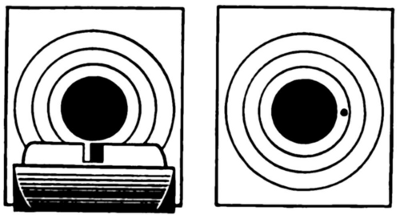
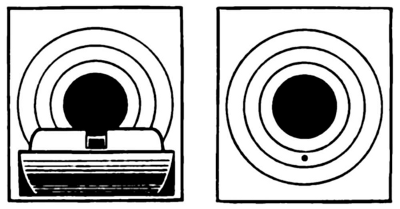
with a Smith & Wesson .38 Military and Police revolver. More .38 S&W M&P Revolvers have been manufactured and sold than any model of any other make of Revolvers.
Mental Control
A few pages back we spoke of the relations between Posture and Mental Control; at first glance this may seem far fetched, in fact, absurd; but the fact remains that the deliberate and absolute relaxing of the diaphragm and neck muscles will be followed by a lessening of nerve tension—and it is nerve tension that is actually responsible for the well-known “buck,” “jitters,” “heebie jeebies,” or what have you, so well and unfavorably known to match shooters. If you don’t know, if you’ve never experienced them, you are free from nerve tension and this section is of no interest to you; moreover, you are far luckier than you’ll ever know. But, if you’ve ever stood on the firing line and suddenly, for no good reason whatsoever, the front sight has begun to do a shimmie in the rear sight notch, the palm begun to sweat, neck and belly muscles tighten and twitch, and the harder you bear down the faster and wider the sights dance, then, my lad, you’ve had the jitters and you know what we are discussing!
There’s only one way to lick them, Mental Control, and here is how it works:
First: lower the arm—you can never stop jittering by tightening up and fighting it, that simply increases the tension, makes you grip the gun harder and messes things up worse than ever.
Second: check your Stance.
Third: SLUMP, sag the belly, loosen the neck muscles, exhale with an open throat.
Have you done all that? Fine! Now start the gun up once more, and STAY RELAXED! Remember this: THE NERVES CAN’T JITTER A LOOSE MUSCLE.
NEGATIVE INSTRUCTION. Although we have most definite ideas on the idiocy of negative instructions and have for years quarreled most cheerfully with coaches who tell their men what not to do in place of what should be done, there are three dire pitfalls that loom in the patch of the really interested shooter that should be brought into the light. For our own purposes of instruction we have tabulated them as follows:
Fighting the Gun. At times the gun just won’t behave, it shakes, it shivers, it comes almost to the bull and then buck jumps to the 4 ring. All right, let it; don’t bear down and grip and sweat and clench your teeth and hold your breath. Grin and take it down and start all over. Don’t fight the gun, it has you licked before you start.
Fighting the Sights. Sometimes the sights are acting up; the front sight will droop in the notch, the rear sight will get fuzzy on the edges, or the front sight persists in sticking to one or the other side of the notch, or the gun cants. Again, don’t fight it, take the gun down. Your hold on the stocks may be off, or your stance, or posture—but, if you fight the sights you can’t give your attention to your real job of getting that shot off smoothly and easily.
Fighting the Bull. And here is the greatest scoundrel of them all, and it’s just another way of saying that it doesn’t pay to try to hold too close or too well. Suppose you have four 10’s, what is your natural inclination? Why, to try your best for that fifth one, isn’t it? And then is when the matter of “fighting the bull” comes into play, and with it we find that we are fighting the gun and the sights as well.
A fine way to check up on these three rascals is to try a “7 and Out” match with some lads who have been scoring fairly consistently. All of them know that they can hold better than the 7 ring so they’ll all be glad to come into the pot for a dime (or however strong the bunch feels). Each man shoots in turn and the first one to slip outside the 8 ring falls out, and so on. Now there is no attempt to score 10’s and 9’s; just to keep inside the 7 ring, but you will find that the last two or three men have made mighty respectable scores—they weren’t fighting the bull.
Calling The Shot
You will remember that in talking about hammer let-off we mentioned the fact that when this is properly accomplished there will be no disturbance of the front sight in its proper alignment with the rear sight notch, and again in sighting it was referred to. In order to assure yourself that no disturbance has taken place, you, of course, had to continue holding and sighting after the hammer had fallen, and it is this practice that will enable you after you have fired your shot to tell where the bullet has registered on the target.
At the instant the hammer falls and the cartridge is discharged, the sighting eye, of course, is open and you instinctively have noted the position of the front and rear sights and their location in reference to the bull. With the proper let-off that is the spot where the bullet registers.
When you can successfully call your shots after firing, you are then well on the way to being a good revolver shot, regardless of the scores that you may be making at the moment.
Shots are called on a target considered as the dial of a clock; for example, a shot directly above the bull’s-eye in the 7 ring would be called “a 7 at 12 o’clock,” direct to the right of the bull in the same ring “a 7 at 3 o’clock,” and so on.
Dry Shooting
“Dry Shooting” is a common name for practicing with an unloaded arm, and when carefully done with full attention paid to stance, posture, sight alignment and hammer let-off, including, of course, calling the imaginary shot, is invaluable in aiding a man in his efforts towards high scores; in fact, it is perfectly possible by this method to instruct so successfully that a shooter will in his first actual string produce a most successful target.
You need have no fear of any injury whatsoever to a Smith & Wesson revolver due to snapping it with empty chambers; the construction of the arm and the selection of the material is such that even constant snapping will have no ill effect.
Sight Adjustment
Sighting in a new or strange arm, to suit one’s individual requirements, is a particular and painstaking task with a hand arm, and especially so with a shooter just taking up this line of sport, because of the difficulty of consistent holding.
We very strongly advocate the first sighting in of the arm to be done with a comfortable forearm and hand rest, using the kind of target on which most of your shooting is to be done and at the same distance. In this way extremely small groups can be made and you will not only, after the proper sight adjustments have been made, have absolute confidence in your revolver, but you will also find that it is excellent practice in proper sight alignment, smooth hammer let-off, and holding.
A muzzle rest should never be used in this work as a support of the barrel at this point will have a surprising influence in changing the position of the group. You will in all probability find, after sighting the arm in with the forearm and hand rest, as suggested, that in shooting offhand the group will have a tendency to drop a small amount, but this can be readily taken care of by a slight elevation of the rear sight when you are satisfied as to the necessity of doing so.
With the Smith & Wesson system of a fixed front sight and a rear sight adjustable for both elevation and windage, the necessary changes are simple to remember: to move the group to the left, move the rear sight slide to the left; to the right, move the rear slide to the right. To raise the group elevate the rear sight, to lower the group lower the sight. In other words, move the rear sight slide in the direction you want the group to move on the target. What could be more simple.
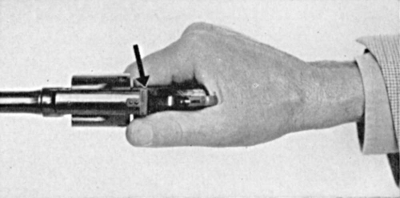
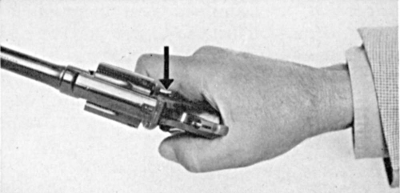
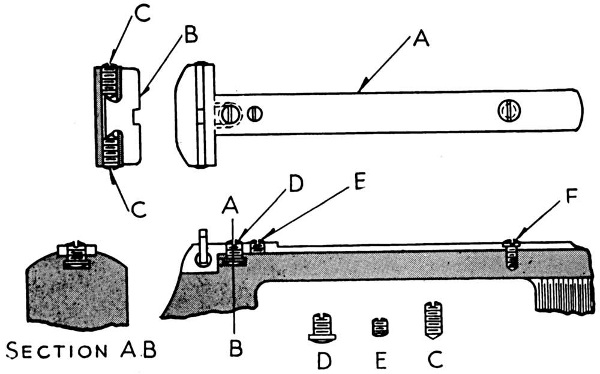
The actual adjustments of the rear sight are made in the following manner: if, for example, you wish to move the group to the left, back out the left windage screw (indicated in the illustration) the desired amount and then firmly seat the right windage screw, this will force the rear sight slide to the left an amount corresponding to the distance the left windage screw is released. With the present Smith & Wesson target sight the matter of elevation is somewhat less simple owing to the addition of a blocking screw which was done recently to insure a positive and non-changing adjustment. To raise or elevate the rear sight, it is first necessary to release the blocking screw, as shown in the illustration, and then secure the elevation by turning the elevating screw in a clockwise direction the desired amount. When this is done, the blocking screw is then set in firmly, and then to make sure that the sight is positively locked, attempt to lower the rear sight by turning the elevating screw counter-clockwise.
It will be noted that as there must be a slight amount of lost motion between the head of the elevating screw and the undercut slot in which it works, the effect of firmly seating the blocking screw will be to take up this lost motion, there by slightly elevating the sight. For that reason we advocate getting the final elevating adjustment by use of the blocking screw, with the elevating screw free, and then drawing down with the elevating screw as firmly as can be done with the Smith & Wesson target screw driver which we supply with each of our target arms.
A rough, but useful rule in adjusting for either windage or elevation is that one turn of an adjustment screw changes the point of impact of the bullet approximately 1 inch at 10 yards with a 6 inch barrel, and, twice that distance for 20 yards; as the barrel length is increased the change in point of impact is of course less.
APPROXIMATE CHANGE IN POINT OF IMPACT OF BULLET AT 10 YARDS FOR ONE TURN OF ADJUSTING SCREW.
Model—Barrel—One Turn Elevating Screw—One Turn Windage Screw
.22 Kit Gun—4″—1 3/4″—1 1/4″
22/32—6″—1 1/2″—1″
Regulation Police Target—6″—1 1/3″—1″
K.22—6″—1 1/3″—1″
38 M&P Target—6″—1 1/3″—1″
38/44 Outdoorsman’s—6 1/2″—1 1/4″—1″
44 Military Target—6 1/2″—1 1/4″—1″
S&W “.357″ Magnum—8 3/4″—1″—3/4”
As the range increases the change is proportional. For example at 50 yards multiply the 10 yard change as shown by five.
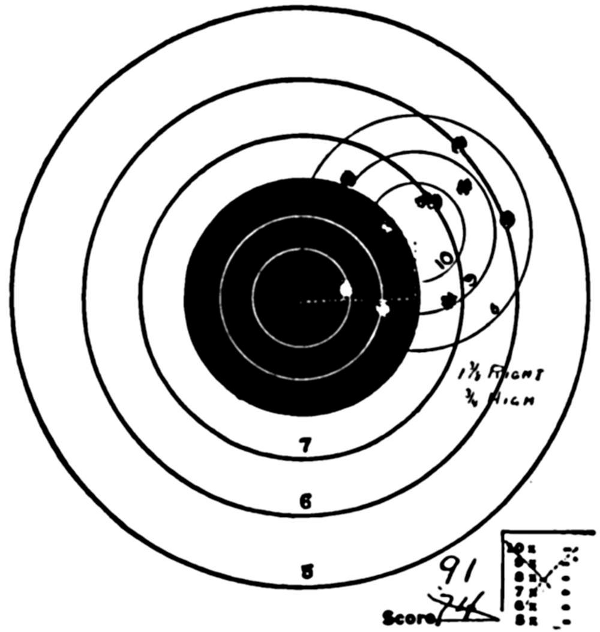
After a revolver has once been sighted in satisfactorily, it is most unwise to make any change in the adjustments until several groups have been fired and it is then found that the centre of these groups all show the same tendency, that is, that all the shots are grouping in a definite location in regard to the bull. A piece of celluloid with concentric circles scratched in it corresponding to the counting rings of your target is a most useful piece of equipment.
For example, the target illustrated below shows the centre of this group approximately 3/4 of an inch high and 1 3/8 inches to the right. Applying our rule for adjustment of elevation we will, as this is a 20 yard target and we are shooting at 20 yards, be obliged to lower the rear sight one quarter of a turn of the elevating screw. To accomplish this, we loosen the blocking screw, and as the threads of the locking screw are similar to the threads of the elevating screw, we will simply loosen it one-quarter turn and then draw down on the elevating screw by turning it counter-clockwise. Our adjustment for elevation is now taken care of. To move the group 1 3/8 inches to the left, we will back out our left windage screw approximately one-half turn and seat the right hand windage screw firmly. You will now have a very close approximation of the proper setting, but remember that the only actual test of any sight-setting is by firing for groups.
Target Analysis
It is possible, by careful scrutiny of various targets, for the Shooting Master or Coach, to make deductions that will allow him to correct faults in the shooter that are quite difficult to determine from watching him.
The easiest fault to identify is that of body sway; frequently the body sway will be so slight as to be practically unnoticeable on the part of the shooter, but the effects can be detected instantaneously by the target. Let us suppose, for example, that we find the group dispersion to be excellent laterally, but decidedly scattered up and down; that is, some 6’s or 7’s at 12 o’clock, and other 6’s and 7’s at 6 o’clock. This should instantly show to the instructor that the shooter is swaying backward and forward in the direction of the target, and can be corrected by moving the left foot more nearly in line with the front foot and target. See page “Stance.” Conversely, should we find the group to be excellent for elevation, but scattered from 3 o’clock to 9 o’clock on the target, it is on account of side sway, and here the correction is a wider stance.
At times a shooter will find that with a revolver properly sighted in he is producing groups somewhat more to the left than usual. The natural thought in this case is to make a corresponding adjustment of the rear sight to the right, but before doing so the experienced instructor will suggest that the shooter try a bit of thumb pressure on the top of the frame to the right; it may be very possible that he is using a bit more than normal pressure with his trigger finger and not compensating with his thumb. Again, if the group tends to form to the right a slightly less thumb pressure would be indicated. If the group is low it may well be that the front sight is drooping in the notch of the rear sight slide, or too much white is being seen below the bull. A high group might mean that the sight is getting up into the black, or that the top of the front sight is rising a bit above the top of the rear sight slide, although this is not at all a common fault.
Target analysis can be developed to an almost surprising point; in fact, we have had the pleasure of carrying on with shooters in foreign countries what actually amounts to a correspondence course, with very pleasing results, and it was entirely due to the fact that targets were sent in that we were able to accomplish this.
