The following information comes from The Elusive Ten by William Reichenbach. The Elusive Ten is also available to purchase in print.
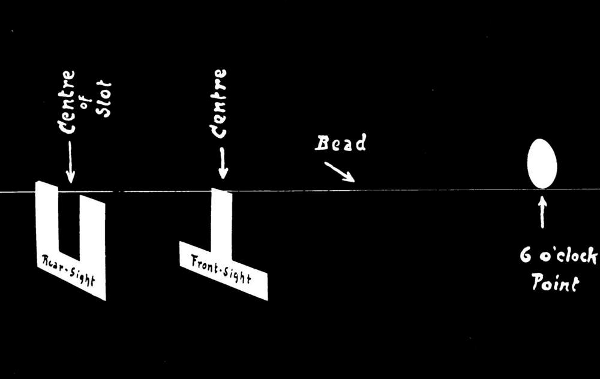
The mechanics of sighting are really not at all complicated, although sighting itself is still regarded by some persons as something of a mystery. The task is to line up the top of the rearsight-slot with the top of the front sight and then with the target. The front sight should be centered in the slot of the rear sight (not too high or too low, but centered exactly) (see Illustration VI) and an imaginary line drawn from your shooting eye over the center of the rear sight slot and over the center of the front sight and leading to the 6 o’clock point on the target, would give the perfect “bead”. (Illustration VII.)
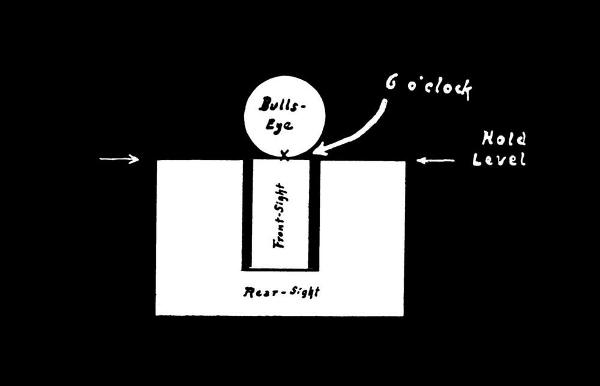
Furthermore, the gun, viewed from the rear, should be held so that the top of the rear sight appears perfectly horizontal or level. Do not tilt or “cant” the gun. (See Illustration VI.)
The sights shown in the illustrations VI and VII were cut from card board and then photographed. They represent square forms which we call “Patridge Sights”. There are other shapes too, but, principally, they all serve the same purpose of guiding your sighting line over the barrel to the target.
Don’t bend your head for sighting but rather bring the gun hand up high enough so that you may aim with a natural position of your head. (See also Illustration V.)
I am advocating in this manual to keep both eyes open when taking aim in order to permit a plastic and binocular view of both target and sights.
There is one thing at least to be said for this method—namely, that you do not have to screw up your face in order to close one eye.
Apart from the interrupted relaxation, closing one eye is a separate and positive muscular action which will detract from the intense concentration which should be directed solely towards shooting.
So, why screw up your face?
Have you ever tried aiming with both eyes open? It is really fun.
First, we have to discover which of your eyes does the work of lining up the sights and target. This working eye has been conveniently termed the Master Eye. It differs with individuals.
We proceed as follows:
Hold a pencil at an arm’s length from eyes and line it up with some vertical line in the background—say, a door jamb.
Now, close your left eye and observe whether the pencil has moved away from the jamb-line. If it has not moved, then your open eye (in this case the right one) is your Master Eye.
If the pencil should move upon closing your left eye, open both eyes and close the right eye. You will then find that again the pencil remains stationary and (it being open) the left eye is your Master Eye.
After having ascertained your Master Eye use it for drawing the bead, but keep the other eye open too.
Look straight at the target, and not through the sights. The idea is to have the viewing lines from both of your eyes converge upon the target. The angle will be less obtuse than if you had the lines converge upon the rear sight, and, consequently, much less strain is encountered, as your eyes need to go into one focus only.
All this is really much less complicated than appears on paper. Many pupils can do it at once.
The thing may need a little mental piloting on your part. Get yourself to concentrate both your eyes solely upon the target and let the sights fall in line behind unconsciously.
Come on, try this: Look at the target with both eyes open. Then bring your gun arm up slowly, with your eyes still trained on the target and on nothing but the target, until the gun appears within your vision.
Although you do not pay any attention at all to the gun and with both eyes glued to your target, you will have a hard time to avoid clearly seeing the barrel and sights.
The following birds-eye sketches will illustrate the why and wherefore.
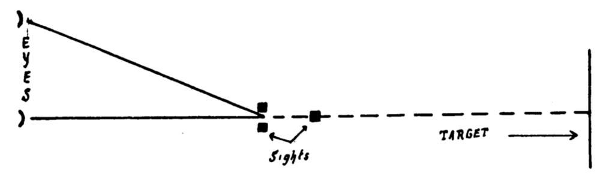
The lines converge upon the rear-sight, are then squeezed together into one line, which strained line then travels over the front-sight towards the target.
The effect is an unclear view of the target. You are sight-conscious and your poor eyes are being kept busy changing their focus all the time.
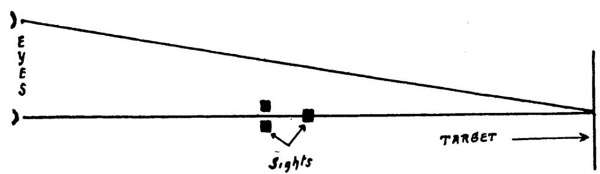
The viewing lines converge upon the target and the sights are lined up behind in an effortless, secondary operation. It is obvious that the effect is a plastic or stereoscopic view of the target—you are “target” conscious.
At first, you may see two images of your gun—one distinct and the other less pronounced.
After a short while, the secondary image will dim and finally disappear.
Needless to say that if your eye-sight is faulty, the oculist or the optometrist should be consulted, preferably a physician who is a shooter himself or one who takes an active interest in your particular problem.
We shall now assume, for a moment, that you are satisfied for the beginning with hitting the black only. (The advanced state of hitting the center of the black most of the time will come a little later.)
Are you satisfied to hit the black only?
Very well. We know that if your gun is sighted correctly, you should aim at 6 o’clock, and the shot—everything being right—should hit the center of the ten-ring.
Well, I say: DON’T AIM AT 6 O’CLOCK. DON’T.
Here, my friend, is a chance to show me that you are really intelligent. There are more important things than aiming at 6 o’clock. Really, there are.
You remember Grip, Stance, Relaxation—in the order of their importance. We have other important items, other more important things than sighting at 6 o’clock.
For the time being, I say again: Don’t try to hold your aim at 6 o’clock!
Your hand, and therefore the muzzle of your gun, are in constant motion. You cannot prevent this. If a person claims that he is able to hold his gun “as steady as a rock,” he is just talking. I say, in contradiction, the muzzle of your gun waives constantly left and right and up and down. With a healthy person, or a person of a stoical or apathetic temperament, these movements are less pronounced and less jerky. Still, the uncontrollable motion of the muzzle persists, and should be accepted as normal.
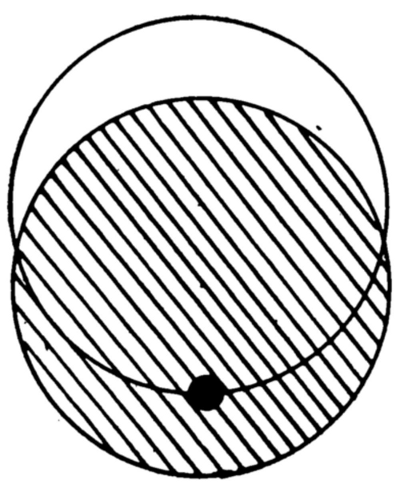
Now, the bullseye is a good three inches in diameter. Allow your muzzle to wander in or under this bullseye, (see Illustration below) and squeeze your trigger slowly. Without anticipation on your part, the bullet will leave the barrel and drill a hole in or near the bullseye.
You will have to take my word for it until you try it yourself. I promise you that I shall prove right, if you will follow just one other little hint- namely, to…[Squeeze, next chapter]
Click here to purchase The Elusive Ten in paperback
