The following information on trenching and soil surface management comes from Five Acres and Independence by M. G. Kains. Five Acres and Independence is also available to purchase in print.
Next to developing and maintaining a good soil as outlined in Chapter 23, tillage is the most important feature of soil management because it largely influences both yield and quality of product. It modifies the physical structure of the soil, alters soil temperature, aerates the soil, makes conditions favorable to bacteria and other creatures that change soil constituents, destroys weeds, prevents soil washing by rains and winter snows and covers manures, green manures, etc., by plowing and digging.
To attain these ends tillage must be done at the right time, in workman-like fashion and with the proper tools. Timeliness is of supreme importance because upon it success may depend more than upon any other factor. Soil conditions may be exactly right today to plow, dig, harrow, rake, hoe, or weed but tomorrow be unfavorable for any of these operations because of a rain and because wetness may continue for a week longer. Weeds will not be slow to take advantage of this opportunity to grow without molestation and they will be all the more difficult and costly to master in consequence. Apart from that, however, the delay may postpone seed sowing or plant setting until conditions are less favorable than would have been the case had the delay not occurred.
Thoroughness is gained first by using the right implement or tool and second by using it in the right way. Labor-saving implements generally do better work, more easily, cheaply and quickly than do old fashioned ones. So before you buy such be sure to determine its efficiency, adaptability to the work required, the ease with, and speed at which it may be operated, its durability and (lastly) its price.
Prior to plowing it is a good practice to use a disc or a cutaway harrow from end to end and when possible from side to side across the area so as to chop up the surface and combine the manure, green manure, weeds, etc., with it 2″, 3″ or deeper; for when this fined earth, manure, and other material is plowed under it mixes more intimately and with smaller air cavities than would be the case with large clods. Water connection between the subsoil and the surface will also be improved and the vegetable matter of the manure made to decay more readily. These remarks apply especially to spring and summer plowing.
You may plow (or dig) whenever the soil is in fit condition—autumn, spring or summer. In cold climates fall plowing (and digging) is especially useful in improving heavy soils, provided the furrow slices and clods are left unbroken during winter just as the plow turns them up; for thus rain and snow water pass into instead of over the ground, penetrate deeply and form a reservoir of larger capacity than if the ground were harrowed then. More important, however, the large, rough clods are broken apart by frost and made finer. Manure, green manure, weeds, etc., become decayed sooner than would the same materials plowed under in spring or summer, hence are more quickly available to the succeeding crop. The soil being more or less on edge, rough and therefore with larger surface, dries out more quickly than if it were flat, so spring harrowing and planting may be done sooner. Fall plowing may often be done when work is not pressing, thus reducing the rush work of the spring. Plowmen are then more likely to be available than in spring when everybody wants them. Fall plowing also exposes many hibernating insects to destructive agencies such as frost, birds and other animals.
In climates where the ground freezes little or not at all plowing in the fall is less desirable than in spring because plant food may be lost by leaching due to autumn and winter rains.
Whether in a cold or a warm climate wait to do spring plowing until the soil has lost its excess water either by drainage or by ordinary sun and air drying. To hasten drying it is advisable to avoid applying manure until just before plowing because this material when spread long before plowing becomes soaked with water, acts like a mulch and checks evaporation of water from the soil.
Books, bulletins, and articles have been written about so-called “plowless farming.” Some writers, without too extensive experimentation or practical experience, have predicted that the traditional moldboard plow is as out of date as the scythe for mowing level fields of grass.
Briefly, the proponents of plowless farming advocate a harrowing or stirring of the top 2″ or 3″ of soil and a mixing of weeds, plants, sods, and debris in the shallow top layer. The whole idea caused great agitation in the farm press and much debate among farmers.
The advocates of discarding the plow base their claims largely on the proposition that crop roots tend to develop near the surface of the soil. They claim that the moldboard plow buries fertilizer and green manures (crops plowed into the soil for humus and chemical contents) so far below the surface that the feeding rootlets do not get the advantage of the food. A second point claimed is that the layer of manure and organic material plowed under to a depth of 6 to 10 inches absorbs moisture from the soil above, thus leaving the plant roots without sufficient water. A third, and not so important argument in practical farming is that plowing per se is in violation of Nature’s laws; Nature never intended that bare soil be overturned and exposed to the air, sun, wind, and rain.
The writer has conducted a number of experiments on the subject with various types of farm crops, and while it is not safe to draw definite conclusions on the basis of a three-year period, the evidence to date is overwhelmingly in favor of plowing in the traditional method with the exception of vine crops. With such crops as cucumbers, muskmelons, and squashes, medium-loam soil that was harrowed to a depth of approximately 4″ produced just as well as land that had been plowed. In the case of the muskmelons and squashes, for two of the three years the crop on land that was harrowed only, was about 10% larger than the one on the plowed area.
But for the practical farmer on the small farm there is another angle that must be considered. On the small farm where a man is using intensive methods, the crop rotation plan is just as important as on a large farm where cereal grasses and hay are raised. And this brings up the problem of weed control. For example, let’s assume that you are raising a half acre of Hubbard squash. A yield of 5 or 6 tons on a half acre is a good crop, though by no means very exceptional. The land is harrowed instead of plowed. The top soil is not turned under; it is simply stirred up and all the weeds, grass, and cultch is chopped up. Inevitably under average conditions this means a big crop of weeds to fight. Even if one keeps the soil clear around the hills of squash plants, it does not help materially on next year’s problem.
As soon as the squash vines cover the ground, cultivation has to cease, and great quantities of weeds spring up and develop seeds before the crop is harvested. One may have an excellent crop of squashes; he also has an excellent crop of weeds. If this same area were to be used for squashes the next year, the problem would not be so acute. And there’s no doubt as we learn more about the food requirements of individual crops that we shall learn how to fertilize so that we can grow the same crop year after year.
But if a man plans to use this half acre for strawberries, or as a plot to set out a new patch of raspberries, he has a big problem of weed control. If the plowing is done in the usual way, to a depth of 6″ to 10″, a great number of weed seeds are buried to such a depth that they do not germinate.
What is the answer for the operator of a small farm? There is just one answer, as is the case for many problems in agriculture. Conduct some experiments on your own soil under your own conditions. Plowless farming has one factor in its favor. It does create a top layer of humus materials, but many farmers do not agree that average crop roots get their food in the top 3″ or 4″. Most roots of most crops go down to a considerable depth. With the use of ample green manures plus organic fertilizer, it is perfectly possible to have food available to a depth of 6″ or 10″. Until more experimenting has been done, the small farmer should proceed cautiously in trying plowless farming. But he should experiment. Every farm should be a miniature experiment station. Traditional experience is no criterion of worth. An open mind is the best guarantee of success.
Harrowing follows plowing (except in the fall) to fit the soil for sowing and planting. Harrows are of many styles. At least two (preferably three) should be used, one for breaking down the furrow slices, the second for reducing the clods and the third for making the surface fine and smooth. The spike-tooth, one of the oldest styles, does poorer work than do many of the more recent inventions. Its teeth do not penetrate the soil deeply enough; they push aside or bury the clods instead of pulverizing them and it tends to bounce and thus miss working on patches of ground. Much better are spring-tooth styles, especially on stony ground because they level the furrow slices well, bring clods to the surface and break them up. Disc and cutaway harrows are even better as pulverizers, especially of soddy and clayey soils. When weighted heavily they cut almost as deeply as their axles. For this reason they are without rivals for preliminary harrowing of heavy soils.
To follow these implements the Acme and the Meeker harrows are especially valuable. The former pulverizes several inches deep, breaks clods missed by the other harrows and smooths the surface well; the latter starts where the former leaves off and makes as fine a surface as can be made by hand with the steel garden rake, crushing even the smallest clods and leaving a well smoothed seedbed when its work is done.
Besides using the harrows best adapted to the soil and the work in hand successful harrowing depends upon the amount of water in the soil. When wet more harm than good may result because of puddling; when too dry a large proportion of the clods, particularly of clayey soils, will remain unbroken. One of the commonest errors is to leave the plowed furrows for several to many days before harrowing them. During this time the soil loses enormous quantities of water through evaporation and the clods, especially if stiff, bake more or less and cannot be broken by the harrow. Therefore, except for fall plowing, make this your invariable rule: Plow in the morning, continue until only so much is plowed as can surely be harrowed before the work day ends. That is, insist that all the ground plowed in the early part of the day be harrowed the same day—none left until the next.
In fitting the plowed ground for sowing or planting you will find the following order of procedure advisable for heavy clay soils: If a sod has been plowed under, the disc or the cutaway harrow will be better than the spring-tooth because the latter may bring lumps of sod to the surface. 1, spring-tooth harrow, dragged parallel to the furrows; 2, disc or cutaway, also parallel; 3, disc or cutaway at right angles to the furrows; 4, spring tooth at right angles to the disc or cutaway work; 5, repetition of 4 if needed, but at right angles; if not needed then; 5, with Acme harrow at right angles to 4; 6, finishing with the Meeker as often as needed to make a fine, smooth and even seed bed, each time being at right angles to the preceding one. If you have a choice between a team of horses and an equally powerful tractor choose the latter, especially if a “caterpillar” style is available, because tractors pack the soil more evenly than do horses.
One of the most important developments in American agriculture has been the gradual evolvement of small practical garden tractors. For the small farm there is no question as to the best type of power. Many persons like horses. A beginning farmer, especially, is inclined to think that a small chunky horse is something that he wants. Unlike cows, goats, pigs, and hens, a horse has a nostalgic value to many people.
But the weight of argument is all in favor of a tractor today. In the first place, the amount of time needed for caring for the power must be considered. If one keeps a horse, it means chores morning, noon, and night, seven days a week, 365 days a year. Considering feeding, cleaning out manure from the stall, watering and grooming, the minimum will be half an hour a day. This means 180 hours a year or 20 full working days of nine hours each. If one is going to raise the hay necessary for the feeding, it will require at least an acre of the best soil.
Of course, a tractor cannot whinny a greeting when you open the barn door. It cannot nuzzle in your pocket for a lump of sugar. But you can give it oil and water and gas on the days you use it. When you put it up for the winter, there are no chores to be done for it until spring. Furthermore, when the rush of spring work begins, you can work it as hard as you wish, 10, 12, or 16 hours a day if necessary. When a horse begins to work in the spring, the farmer has to be very careful. If a sore appears on the horse’s shoulder, where the collar presses against the flesh, it may be that one will be without power in the most crucial period of the year’s operations. If seeds do not get into the soil at the proper time, one may lose a considerable amount of profit. On the small, intensively cultivated farm the earliest crops often produce the big profit.
The farmer will have to choose between two types of tractors. Each has advantages and disadvantages. The riding type of tractor is now available in small-size models from 6 horsepower to 12 or 15. It performs all needed farm tasks with ease on the small farm. It plows, harrows, and cultivates. With a power take-off one can mow hay or run a wood-sawing machine. If most of the farm is tillable soil, many farmers believe this is the best all-round source of power.
The other type is commonly called the walking type tractor. This type comes in many models from the small half-horsepower cultivator for the garden to the type that has four or more horsepower. This latter type has power enough to turn a 6″ furrow in reasonably good soil; it will pull a disc harrow; it furrows out for planting and is efficient for cultivating crops. If the operator of a small farm is utilizing not more than two or three acres for cultivating, this larger type walking tractor will give satisfactory service under most conditions.
In the writer’s experience and from observation of practices on many small farms, the ideal combination for farm power is one of the smaller type riding tractors plus a small one-horse or two-horsepower garden cultivator. The first will do the heavy work of plowing and harrowing. It will do the cultivating for the corn, squashes, melons; it will do the cultivating for such crops as strawberries when the plants are first set. But the small machine is ideal for cultivating between the rows of asparagus and raspberries; it is ideal for the vine crops as they begin to spread. It works well between the strawberry rows as the runner plants begin to set. It will keep the house garden well tilled.
Several of the major farm implement manufacturers have a riding tractor with a one-bottom plow and all the necessary accessory tools: harrows, rollers, weeders and cultivators. For approximately $1,000-$1,200 one can purchase a complete outfit that will handle adequately all the power requirements on the small farm. A good standard outfit if given decent care will last 15 to 20 years and often longer.
Ample power always available is one of the major secrets of success in intensive farming. A good tractor will last for many years if the machine is given good care. It’s abuse, and not use, that wears out farm machinery.
This contrasts with a figure in the neighborhood of $400 for a good young work horse, harness, and the line of necessary farm tools. It is true that oftentimes a beginner who must conserve his capital can get his power cheaper with a horse. And there are occasions when a beginner will undoubtedly be wise to start with horse power—and shift as soon as possible to mechanical power.
But again it must be emphasized that the small farmer should consider his situation carefully before investing in a horse. It costs money to feed a horse all the year round. It adds to the chore time, morning, noon and night 365 days a year. The farmer with mechanical power has a definite advantage over the man who depends on a horse.
When the area to be made into garden is too small to be plowed by team or tractor the work must be done by hand. Fortunately you can thus do a far better job than with power tools because you can give every cubic foot intimate personal attention.
Six tools are in popular use for garden digging; namely, the long and the short handled shovel, the long and the short handled spade and the long and the short handled digging fork. The first three are incapable of doing as thorough a job as the last three. As the blades of the shovels are shorter than those of the spades and are curved they cannot be as deeply thrust in the soil; also only the curved tips reach maximum depths. Though the long handled spade and the long handled digging fork are powerful tools for prying up the soil clods their round handles make them hard to turn when inverting “spits” of soil. (A “spit” is a gardeners’ term for the chunk of earth full depth of the spade blade and as wide both ways.)
The short handled spade and the short handled digging fork not only dig deeply when their blades or tines are thrust vertically in the ground but, because of their D-shaped handles, they are easy to turn over when dumping the spits of soil. Of these six tools the spading fork is the best for all soils except sandy ones which when dry may not lift out well but more or less slip between the tines. For such soils the spade is to be preferred.
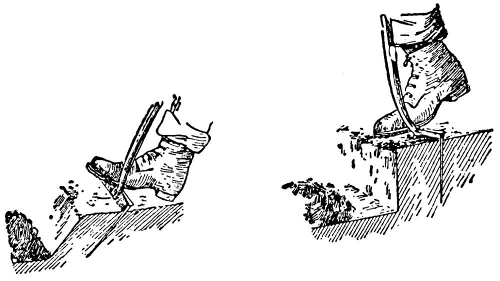
The wrong way to use spades and digging forks is to thrust them in the ground more or less slantingly. (Fig. 36.) This demands more stooping than the correct way, is much harder work, does not properly bury the surface material (manure, weeds, etc.) and requires fully as much time as the right way.
The right way to use the spade and the fork is to thrust the blade or tines vertically full depth in the soil using the foot to bring the crosspiece at the top even with the surface, then to pry the spit up, invert it completely and finally break it small with blows from the tool. The advantages of this are that manure, weeds and other trash on the surface are completely buried.
Ordinary digging consists in inverting the soil only one spit deep. When the soil is well drained, either naturally or as described in Chapter 16 this is usually sufficient, though it is a good plan to deepen the whole area either by plow and subsoiler or by one of the various styles of trenching. In substitute trenching (the simplest but least satisfactory of trenching methods) the surface spit is dug in the usual way but the layer beneath this is loosened either by thrusting the fork deeply and at short intervals into it, by lifting up spits and letting them fall so hard as to break or by inverting them in the same way as the surface spits are turned upside down.
True trenching is safe to practice only where the soil is already deep either naturally or from previous good management. A trench two spits deep is dug at one end across the area to be trenched and the soil wheeled to the opposite end where it is laid in a long pile. Then a second trench is dug one spit deep next to the first and this top soil thrown in the bottom of the first trench. Before digging the lower spit of this second trench a 3″ or 4″ layer of well decayed manure, leaf mold or rich vegetable compost is spread on the inverted top spit. Then the lower spit of the second trench is dug and placed on the compost. This order repeats itself until the last trench has been dug when the soil wheeled from the first trench is shoveled in.
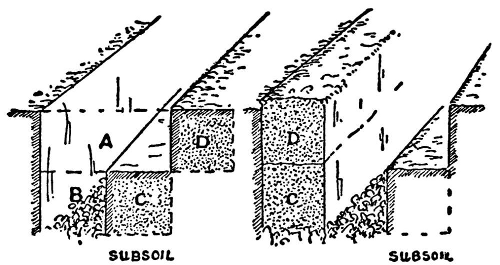
So-called “bastard” trenching is a safer method where the soil has not been improved. The surface soil two spits across (Fig. 37.) and the full width of the area to be trenched is dug out and wheeled to the farther end where it is laid in a pile as long as the area is wide. Then a trench one spit wide and one deep is dug in the subsoil (B), wheeled and piled parallel with but separate from that already placed there. Next, the subsoil (B) is broken with the spading fork (or a pickaxe if hard) and a 3″ or 4″ layer of vegetable matter worked into the loosened earth. Then the subsoil (C) is dug and placed on the loosened lower layer just described. Next, the top soil (D) is dug and placed at D, thus exposing the subsoil C which is dug and moved to C and the subsoil dressed with vegetable matter like B. This order of procedure continues until the farther end of the area is reached when the pile of subsoil wheeled from B is placed in the bottom of the trench, a layer of vegetable matter added and the surface soil taken from A placed on top of it. Bastard trenching is excellent as a preliminary process for one to three years prior to true trenching.
The advantages of trenching are so great that in private gardens the work justifies itself; for the plants grown in trenched soil have at least double the feeding area that others have in soil prepared by ordinary digging or plowing. In most climates they require no irrigation because the trenched soil catches and holds far larger volumes of water than does soil ordinarily prepared. The results are that the plants thrive amazingly and in case of fruits and vegetables are of far superior quality to those grown in less carefully prepared ground.
Two great advantages that digging has over plowing are first that every cubic inch of soil may be given intimate personal attention and second that when properly done a larger proportion of moisture in the soil may be saved. To do the work properly break each spit with the fork as soon as you turn it over, by “spatting” it or thrusting the tines into it and twisting them or by doing both to break the clods. The best way to break the spit is to give it a sidewise blow so one tine after another will strike it and each take off a slice. In this way you will do a better job with less effort and with less risk of breaking the tool than if you whack the spit with all the tines at once. Furthermore you will leave the ground in better condition for the next operation—raking.
The steel rake takes up soil preparation where the harrow or the fork (or the spade) leaves off. When digging, always use it when you have dug four or five rows across the garden because you can thus stand on firm ground, avoid tramping on the soft, newly dug soil and, most important, do a thorough job and save the greatest amount of soil moisture. Always rake immediately after digging—never postpone this work until next day, or even from morning until afternoon.
Of all the tools the rake is most often used improperly and carelessly but with which you can take most pride in using skillfully. Its primary mission is to break up and pulverize clods and remove stones and trash that later would interfere with cultivation and the well-being of plants. Second, it reduces hillocks and hollows to one uniform surface. Third, either turned upside down or right side up, it may be used to open little furrows for seed sowing. Fourth, when the handle is held almost vertically and the head patted upon and along the row it is excellent to firm the seed in the soil without packing too hard.
The proper way to use the rake is to start by a push and pull movement (not a downward whack) so as to hit only the tips of the clods with the teeth, then gradually work lower until the clods are completely broken and the teeth move freely their full depth through the soil without encountering obstacles, sods, weeds and other organic materials having been brought to the surface and thrown in the bottom of the trench, and the stones and other things that will not decay removed. Should there be small hollows in the surface, turn the rake upside down (teeth pointing upward) and use the back to draw loose surface soil from adjacent elevations. Then be sure to rake the elevations full depth of the teeth to get rid of any buried clods that may have been made nearer the surface by the removal of the soil. After the rake has finished, the garden will be ready for seed sowing and plant setting.
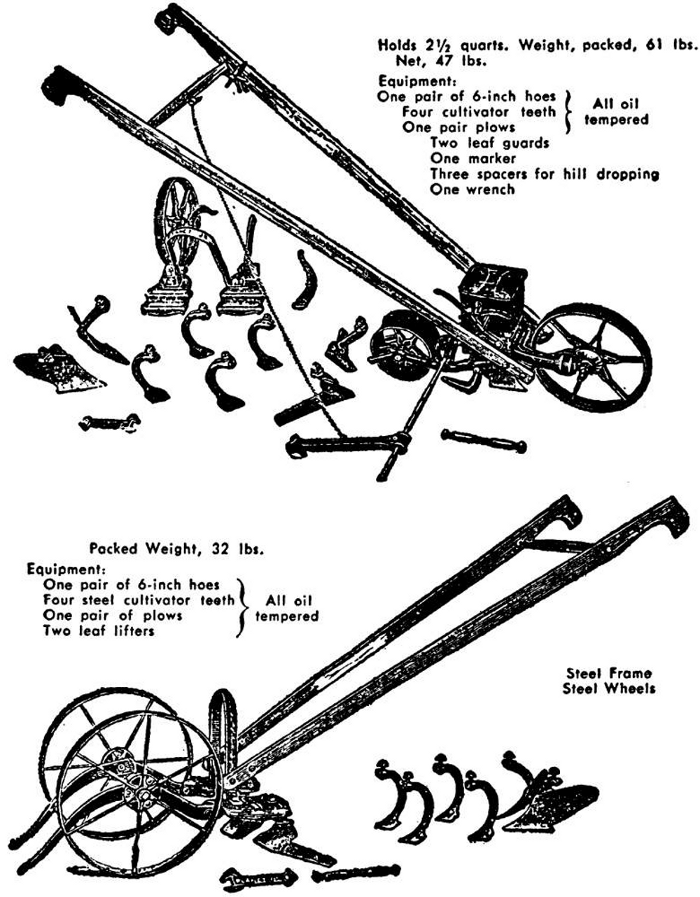
If your vegetable garden is smaller than 50 x 50 feet you will probably sow the seed by hand. But for this and larger areas and for quantities of vegetable seed larger than packets the seed drill will not only save a great deal of time and work but if you adjust and use it properly it will do a better job than can possibly be done by hand. It makes straight and narrow rows, opens the furrows, drops, covers and firms the seed, and marks the course of the next parallel row as you leisurely stroll across the garden. More even than all that, with its roller it leaves an easily seen mark from end to end of each row, thus enabling you to start cultivation and weed killing before the vegetable seeds appear. Still further, it confines the seedlings to a much narrower space than the hand can. Thus it favors the work of weed killing close to the seedlings and therefore reduces hand weeding.
These machines may be bought separately or as attachments to many styles of hand wheelhoes, the latter preferred for the small garden. As they sow one row and mark the position of the next, a taut guide line is needed for only the first row, the others being parallel.
Whether or not you buy a seed drill be sure to get at least a wheelhoe because it will save an enormous amount of work with the hand hoe and the rake and do it better.
When choosing a wheelhoe bear the following points in mind: Styles with high single wheels and broad tires are easier to run but more unsteady than those with small wheels and narrow tires and most of them have fewer attachments. Single-wheel styles will work in narrower spaces than 2-wheel styles but are less firm and therefore harder to guide. Though they work well between but not very close to the rows they can be used on only one side at a time. Two-wheeled styles can work both sides of the rows at once and more closely to the plants than would be safe to risk with a single-wheel style. Moreover, many of the double-wheel styles may be converted into single-wheel implements by removing a couple of bolts and attaching only one wheel.
Whatever style of wheelhoe you choose be sure to get the following attachments: Right and left cultivator shovels. When placed with their points together these make a fair substitute for a shallow plow; when the points are separated they will throw earth away from the row of plants between them; and when reversed they will throw earth toward the row between them or cover a furrow previously opened. Cultivator teeth, usually four with each machine. These tear up the packed soil between the rows. They cannot be run close to the rows without danger of injuring the plants. Two pairs of sweeps (or scuffle hoes), one long, the other short. When set close together these may be run within less than an inch of the seedlings without risk of injury. They slice the surface soil between or on each side of the rows, cutting 1/2″ deep or deeper. One pair each of three-prong and five-prong rakes, the former for narrow, the latter for wider spaces between rows.
Besides these essential attachments are several others which may or may not be worth your having. For instance, the plows one of which throws the furrow one way, the other to both sides. Though convenient these are unnecessary when the right and left shovels are included. A pair of small toothed three-gang cultivators do better work close to the rows than do the ordinary cultivators because they turn up smaller clods. The three-gang discs are excellent to cultivate close to drill-sown rows before the seedlings appear and for one or two later cultivations—while the plants are small. Thus they destroy the earliest weeds close to the rows and so reduce the amount of hand work in weeding. An excellent attachment to substitute for the discs is a pair of sweeps with extra high sides. These not only cut the surface earth close to the plants or the row but prevent clods from being thrown over the seedlings. Another substitute is a weeder attachment. This is set so as to stir only the surface 1/2″ in which it destroys millions of weed seedlings without reaching deeply enough to disturb the sown seeds over which, as well as between the rows, it is run.
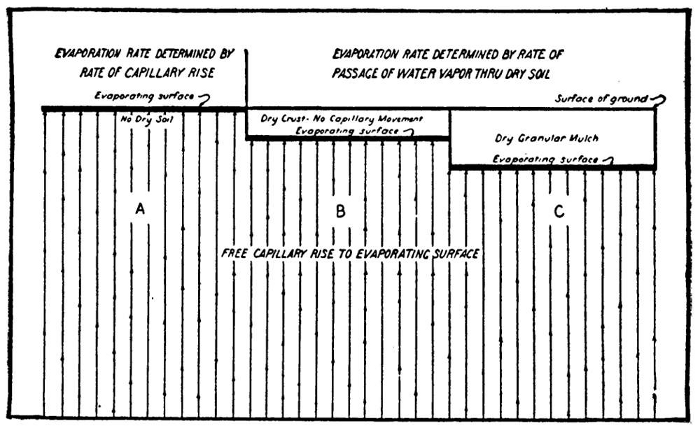
You cannot overestimate the importance of starting cultivation within three or four days of seed sowing or of repeating the work as soon after every rain as the soil crust has ceased to be sticky. If you do not have a wheelhoe or if the attachments you have are unsuited to get close to the rows of newly sown seed use the steel rake (or the wooden garden rake if the soil is light or sandy) over the entire area in the direction of the rows three or four days after sowing provided the soil is not too wet. The main object of doing this is to kill the tiny weed seedlings just starting to push through the soil. These always start to grow before the sown seeds are ready and thus may choke out the seedlings or force you to do a lot of finger and thumb weeding to save them. Have no fear that the first raking will destroy the seeds sown. Some may be brought to the surface and wasted but the chances are that you will have sown them too thickly anyway and would only have to thin out the excess plants.
This early cultivation with either wheelhoe or rake makes a loose surface which tends to check evaporation of water from the soil. Similarly you should cultivate at least once in 10 days (better every week) and after every rain that forms a crust, waiting, however, until the crust will break easily but before it begins to bake. As the plants grow and their foliage extends toward the centers between the rows you must narrow the scope of cultivation and when the leaves of any row begin to touch those of the next stop tillage altogether. The depth of cultivation should be only 1/2″ close to the young seedlings but deeper a few inches away and deepest in the middles between the rows. As the season advances, however, it should be shallower as well as narrower than at first.
The hand hoe is by no means unnecessary. Even though you have a wheelhoe you will need to do more or less hand hoeing. However, you may lighten these labors by using smaller bladed tools than the ordinary rectangular style. Also various patterns do work superior to that of the common hoe. This hoe is too heavy for convenient use and too broad for deep penetration of the soil, for narrow inter-rows or spaces and close to delicate plants. Instead of it choose an “onion hoe,” one with a narrow blade and a solid shank into the conical hollowed end. (Chapter 31.)
Of the many styles of narrow and pointed hoes that do good work perhaps the Warren or heart-shaped hoe is the most generally useful. Its point opens furrows for seeding and the “ears” close them. It is also better adapted than the common hoe to dig shallow holes for transplanting, etc. Besides these pointed hoes are the scuffle (Dutch or push) hoes or scarifiers which merely slice the surface and which, being operated as one walks backward, leave an untrampled surface. They are specially useful after plants have grown too large to admit of using the wheelhoe, for maintaining a shallow dust mulch and controlling weeds toward the close of the growing season.
Hand weeding is nowadays far less laborious than formerly. The tools and methods already discussed have reduced it and so have the many styles of hand weeders. My own favorite, the Hazeltine, is made of a piece of flat steel bent somewhat like a crooked finger and with one continuous cutting surface divided into five parts—a 1-inch end for close work among seedlings, a 2-inch “end joint” for thinning plants in the row, and a 4-inch “middle joint,” also for thinning to this distance and for quick cutting of the surface beside the rows. The speed and skill with which this tool can be worked is astonishing and satisfying.
Lang’s weeder is somewhat similar to the Hazeltine but is much smaller and has a strap over the fingers to hold it when not in use, thus leaving the hands free without having to drop it and then pick it up.
Another excellent tool for thinning and transplanting is the “onion weeder” which somewhat resembles a triangular hoe with a relatively broad blade and only a single hand hold.
The Excelsior weeder, like a hand with five stout, stubby but bent fingers and the Eureka, with three bent, stiff wires, are more useful for loosening the surface soil near plants and for scarifying than for actual weeding, though when used before weeds appear they kill countless seedlings.
If your garden is very small the Norcross cultivator (or weeder) in a limited way will take the place of the wheelhoe. It consists of five adjustable bent steel prongs with flattened, blade-like tips which readily penetrate and loosen the soil between the rows. When the center blade is removed the tool may straddle the rows of seedlings and weed or cultivate on each side. By sliding the top plate the width may be varied to suit the work in hand.
The long-handled Hazeltine weeder is not to be compared with the short-handled one or with the narrow-bladed hoe because it cannot be operated so accurately and is awkward when used as a hoe. As a loosener of the surface inch of soil and as a weed seedling killer it is also inferior to the “Speedy Weeder and Scarifier,” a tool with a two-edged narrow blade that may be used to cut either shallow or rather deeply by either pushing or pulling it through the soil.
Click here to purchase Five Acres and Independence in paperback
