The following information on the pack saddle and packing comes from Chapter 10 of Hunting Our Biggest Game by Clyde Ormond. Hunting Our Biggest Game is also available to purchase in print.
Once an elk is down, the hard work begins. Unlike grizzlies and goats, the meat of an elk is always saved. This involves some basic field-care.
Where one hunts with a guide, this is simple. The trained guide supplies most of the know-how, and the hunter assists with the tugging and lifting. But where the hunter hunts on his own, he must dress out and care for the trophy and carcass himself.
Briefly, the same field-care applies to both the elk shot for trophies and smaller beasts killed for sport and meat—with the exception of the cape. First, the animal is dressed. This is most important with elk. Gases will begin forming within an hour after an elk is killed causing it to bloat. Animal-heat from the neck-shoulder area especially will begin a souring process around the gullet. Elk have been known to sour within six hours after killing, and I know of no wild animal whose meat will sour quicker.
An elk is dressed just like a moose, and the cape removed in the same manner. Thereafter, depending largely upon the remaining hours of daylight and available man-power, the carcass is either quartered-and-hung, or somehow laid spine downward over some kind of logs or brush-heaps, so that it is entirely off the earth, and ventilation can take place around the entire animal. The sternum and pelvic bone have both been split, of course, so the carcass can be opened wide, and held in this position with a length of stick spreading the rib-cage.
In early season when blowflies are still prevalent, it’s best to cover the entire carcass with a five-yard length of cheese-cloth taken along for the purpose. If the carcass is quartered, this strip may be cut into four equal lengths, and placed over the meat side of the quarters. Black pepper dusted into wet areas and fresh blood smeared over all meat surfaces, causing a glaze, both help to thwart blow-flies. Pine boughs loosely placed over a carcass or hung quarters will keep magpies and camp-robbers from pecking the meat.
When the carcass is thoroughly cooled out, it may be packed in to camp. Packing hot meat both toughens the meat fibers, and is an invitation to ruination. No good packer will do it except in some sort of emergency.
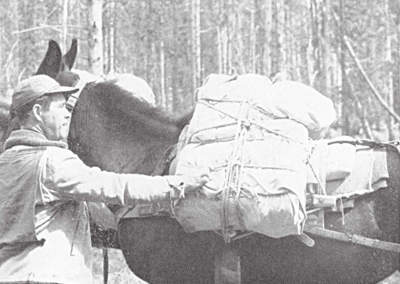
The best protection for elk quarters I’ve ever found, whether they’ve been skinned out or the hide of the quarters left intact, is a set of four cotton muslin bags sewed up large enough to completely cover the quarters, and with a draw-string in the tops. These bags may be placed over the meat before packing to camp, and serve equally well as covering for the meat while hung at base-camp, and for the home trip.
I have yet to see an outfitter or packer who liked to pack out the neck of an elk. They all agree that loose neck-meat unbalances the front quarters, if left on, and is hard to lash onto a pack saddle. I suspect that the weight has a bearing on this, also, as the neck of an elk, especially on a big trophy bull, is a monstrous thing indeed. Anyway, the standard procedure among guides is to saw off an elk neck ahead of the shoulders.
Such incidentals as the heart, liver, tongue, and so on are all hard to field-carry on a mule and are handily “forgotten” by many guides. The tenderloins, too, are often ruined in the process of quartering, hand-wrestling, and mule-packing of elk-quarters.
Despite this, some of the choice cuts of an elk are these incidental portions. Since they spoil more quickly than well-cooled quarters, the sensible thing to do is to eat them at camp. The camp-cook who knows how to prepare these cuts well becomes a popular man indeed. Here are some recipes, tested in many a hunting-camp, and which utilize these items:
Cool elk-liver at least twelve hours, preferably in saltwater. This removes the blood and animal-heat. Slices cut one-half-inch thick, dredged in flour, and fried slowly with a pan of golden-fried onions, is hard to beat.
Elk-heart may be similarly fried, though it should be cooked longer. Both elk and moose-hearts are fine if stuffed with the same type of dressing used in a roast turkey, and baked slowly in a moderate oven. Bacon-strips placed across the top will prevent drying out, and make the dish self-basting. Pickled heart, too, is fine.
Tenderloins are best removed from the animal immediately after dressing out, wrapped in a clean section of cheese-cloth, cooled at camp, and fried in butter in a hot Dutch oven. Cut tenderloin across the grain and at least 3/4-inch thick.
The brains of both moose and elk, if removed and cleaned soon after the animal is caped out, may be used just as calf-brains of domestic beef. Brains-and-scrambled-eggs at camp make the lover of this home dish happy, and are a welcome relief from the canned pork-and-beans and bacon necessary, but monotonous, in any hunting-camp.
One of the very best incidental cuts from an elk is the tongue. This portion should be removed from the head, washed clean, and boiled in salt-water for two to three hours. After this amount of boiling, the tongue skins out easily. It may then be sliced cold, or ground and mixed with mayonnaise, and used in the lunches put up for days of hunting or trail use. I’ve yet to find a hunter, experienced in eating beef tongue or not, who didn’t like cold elk-tongue fixed as above. In several instances, some joker would ask, trying to turn the stomach of someone trying it for the first time, “You know what that bull’s been licking, don’t you?” But the hungry hunter kept right on eating and liking it.
There is no better way of utilizing an elk-neck, and very few more delicious camp-dishes, than a hunter’s-stew made of elk-neck. No other meat gives a stew a better flavor or adds a better body.
The choice cut is taken right behind an elk’s ears. Five pounds of meat-and-bone are chopped out and taken to camp, wrapped in cheese-cloth and carried in the saddle-bags or ruck-sack. At camp, the meat-and-bone is cut into fist-sized chunks, and there’s no better tool for the purpose than a clean ax-blade. The chunks are washed clean and put to simmering, not boiling, in a large kettle or Dutch oven. It takes from three to four hours to cook the meat. In the order of the time it takes to cook them, add a half-dozen carrots, one-half cabbage, three large spuds, a couple or more onions, and a can of pre-cooked beans. When all ingredients are well-cooked, pour in a final can of condensed tomato soup, or one-half bottle of catsup. Season to taste and serve while red-hot.
Such a stew relieves the monotony of fried food at camp. It’s good for any meal. It’s easy to heat up quickly for hunters getting in late, and with bread and butter, is a complete meal in itself. The first plateful is as good as the last drop, and invariably such a dish is completely licked up—often with unbelievable speed.
Slats of the rib-cage may be eaten within three to four days, in cases where it is desired, or where the hunter wishes to transport boned meat. Such rib-sections are best roasted or baked.
Other incidental trimmings, if mixed with a chunk of pork-fat brought along for the purpose, may handily be ground up with a small hand-grinder, and make the best “bull-burgers” in the world. They’re seasoned and cooked exactly as with hamburgers or hamburger steak. The member of the party with false-teeth usually loves this kind of meat.
One of the best camp-dishes I’ve ever eaten, bar none, was a twelve-inch square of mountain sheep ribs, roasted on a pointed stake before an open fire, and tended by a Casca Indian guide in the wilds of Canada. Amos Allick, the guide who cooked it, assured me that it was this dish, and similar cuts from a moose or sheep, which enabled his tribe of hunters to move through the bush for a hundred miles at a time, with nothing more than rifle, shells, matches, and a small bag of salt—and come out well-fed. I could easily understand this after gnawing the meat off several of those foot-long, well-cooked sheep-ribs.
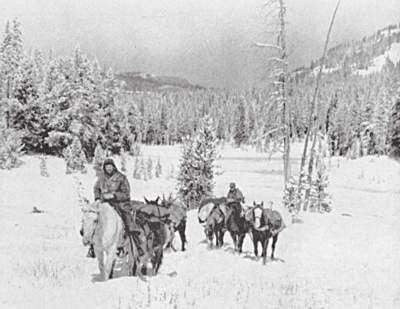
In a general way, elk-hunting and pack stock go together. No other method of getting elk-quarters to camp will beat packing them upon a horse or mule, a pair to the load, and upon a suitable saddle. In rare instances, elk may be skidded downward to available jeep-roads. Or, in heavy snow, the quarters may be hand-skidded for short distances upon the hair side, or snaked with a work-horse, either trailer-hauled along for the purpose, or rented from a wilderness ranch. But for all practical purposes, an elk has to be animal-packed to camp.
Packing the meat of a large animal without ruining it or the pack animal is an art. Over the years, a special kind of pack saddle and cover have been developed for the purpose. This is the “decker” saddle, used in conjunction with two heavy-canvas mantas and a pair of lash-ropes. This rig was developed in the Salmon-Selway-Lochsa areas of central Idaho, and has now spread into most all wilderness countries where elk are packed out of the hills.
In many elk-camps you will still find on outfitter using a few of the old combination sawbuck-saddles-and-panniers, which was standard pack saddle equipment of three decades ago. These old-type riggings are used mostly to carry duffel and camp-gear, with the available deckers used on the meat. In many camps, one has to search to find a single sawbuck saddle used.
The basic reason for using a decker saddle, over the sawbuck, is the fact that with sawbuck-and-panniers one has to have a balanced cargo containing two packs, or loads of equal weight. This, of course, to prevent galling and crippling of the pack animal. No provision is made with a pannier for shifting the overall weight up or down. Many old-time packers licked this basic fault by adding rocks or other ballast to the pannier containing the lighter load, making the cargoes balance. Others shifted the top-pack slightly onto the lighter side, roughly accomplishing the same purpose.
These were make-shifts which the newer decker saddle overcomes. With a decker-and-mantas, a packer can easily balance two cargoes of reasonably different weights. Further, he can with this rigging balance two cargoes of violently-different shapes and bulks. And lastly, he can pack sizes and shapes of cargo which simply could not be made to fit inside panniers. It is safe to say that anything within reasonable weight-limits can be carried on a mule or horse with a decker saddle, mantas, and lash-ropes. Such items as baled-hay, delicate food-stuffs, sacked oats, heavy camp cooking-stoves, meat, and delicate camera-outfits are regularly carried on this type of gear.
The most revealing instances I know of the extremes which a good packer can haul on such rigging, when necessary, occurred far down the Selway River. Old Frank Horrace lived there on Running Creek, in a cabin roofed with cedar-shakes and puncheon floor hand-hewn with a broad-ax. Phil Shearer lived several miles on down-river below him, and was his neighbor. That was in the day when the road didn’t extend to Paradise Ranger Station, where it is today; but all equipment necessary to ranch-living had to be hauled on a pack string from Darby, Montana, some sixty miles from Frank’s ranch.
Needing stock for ranching naturally necessitated the use of machinery for making hay. Frank hauled in such items as a two-horse mowing-machine, and horse hay-rake of the hand-dump variety, all the way from Darby on pack stock. In case you don’t know, such a mower weighs several hundred pounds. And the rake is approximately nine feet in width, and has two outside wheels with a diameter of about five feet each.
I exclaimed over such a feat, while visiting Frank’s cabin back in 1942—in fact while I was eating a mince pie made of bear-meat, and some jelly made from wild elderberries; and most delicious, I might add.
Frank simply grinned. “Why, that ain’t much of a stunt. Us old-timers had to do such packin’ all the time. They wasn’t no other way. Why, that was simple beside some other packin’ we used to do. How do you think Phil Shearer and me done our hayin’?”
“I wouldn’t know. How?”
“Well sir, we had just one outfit between us. He’d come up here and we’d put my hay up. Then we’d tear down the mower and rake, and load the parts on mules and haul it all down the river to his place, and put up his’n. Then we’d leave the whole she-bang down at Phil’s place for the next cuttin’ of hay, then tear her all down again and pack it up here for mine. We done that for years on end.”
The basic secret of the decker’s saddle’s success lies in the fact that cargoes of uneven weight or bulk may be shifted up or down and still ride well. The heavier package is naturally placed higher up on one side, the lighter cargo allowed to sag lower down in the lash-rope on the opposite side of the animal. This, plus the miracle of the “swing-hitch”—the hitch without a knot—makes the outfit a most simple, ingenious rig.
Fundamentally, a decker saddle is nothing more than a sawbuck saddle with two iron loops having flattened ends, riveted on in place of the X’s of the sawbuck, and using no panniers, or saddlebags. Anything to go is wrapped tightly into the mantas, tied with an ingenious hitch with a manta-rope, and lashed down upon the saddle.
Mountain packers are a tough, hard-bitten breed of rugged individuals, able to accomplish most anything connected with pack stock, and with set notions of what a dude’s “necessary” gear should include. The average packer can lick the wilderness with a horse and a mule, his rifle, a pair of Levi britches, and a skillet. The dude he hauls into the hills usually needs a mountain of gear and equipment to make him comfortable—or thinks he does.
Consequently, at any road’s-end camp, there is an inevitable “shaking down” of the dude by the packer. It ends, usually, most amiably; but with the packer thinking, “Jesus Christ! That lard-hinder has brung everything except the kitchen-sink fer me to pack into the woods!”…and the dude thinking, “Hell’s bells! Does that lug I’m paying think I can live on that?”
There is a vital connection between the hunter and packer and their first impressions, as touched on before. If each understands the problems of the other, they’ll hit it off fine. One of the best ways for the hunter to get off on the right foot with any packer, is to show an understanding of the basic procedure, and limitations, of packing.
In instances where the hunter is a pure tenderfoot around pack stock, the best thing to do is simply say, “Joe, I don’t know beans about packing. But I’ll help any way I can.”
Usually this means that it’s best to stay entirely clear of the pack stock, saddles, and cargoing-up. However, there is no need to remain ignorant very long. The hunter willing to learn, and who is observing, will soon progress from the simple ability to hold a horse by the halter-rope, to where he can actually assist with the packing. Too, in any big hunting-camp, the many and often unexpected jobs suddenly pile up, so that the outfit becomes temporarily short-handed. An extra “hand’s” help is often appreciated. In emergencies, it becomes vital.
Many times at our own hunting-camp, we’ve had one lone packer come in with a mule-string, to bank, and pack both the camp and meat to camp, when under normal circumstances at least two packers were necessary. This has been because most members of our parties were long familiar with pack string operations, and actually helped with most of the packing.
An extreme example of this occurred in the Selway several years back, with my neighbor Lawrence. He went out, after employing a packer and paying his deposit, to hunt elk. However, a heavy, freak snowstorm suddenly came, marooning the camp—full of hunters, with their game down. The outfitter simply hired Lawrence, who knew the fundamentals of packing; gave him a gentle mule-string; and Lawrence was on the regular meat-string for a week, doing his own hunting later.
Lastly, the resident hunter who hunts elk in big country should certainly know the fundamentals of packing, if he uses his own or rented stock.
The weight-limits, and cargo-size of duffel have been mentioned before. For packing meat, the front quarters of an elk are hauled on one animal, the two hind quarters on another. In the case of large bulls, the two heaviest pack animals are normally used—especially if the carcass has to be moved out of tough country. No packer will haul more than half an adult elk on a single animal. The one with the lighter load usually carries the antlers, firmly lashed on as a top-pack.
Elk-quarters are packaged in the mantas so that they will ride hair side against the animal. Every packer has his preference, but most of them pack the hind quarters so that the left quarter of game rides on the left side of the pack animal. Since the hind quarters of an elk are cut off at the third rib from the rear, this makes a relatively long pack. In the case of small or average elk, the hind quarters are slung on with a simple swing-hitch, after being manta-ed. The hind quarters of a huge bull are best lashed on with a “barrel-hitch.”
The front quarters are lashed on similarly, with hide of the quarter against the pack animal, and the left quarter riding upon the pack animal’s left side. Some packers pack the quarters with the shank downward, some with the shank pointed rearward. In either case, the front quarters are lashed on with a swing-hitch, or variation.
Anyone with a rudimentary knowledge of horses, and who can tie, or throw four basic hitches, can do a fair job of packing right off. Mules are something else again. A mule, though often looking stupid, is one of the canniest of beasts. He’ll come uncorked for no apparent reason. He’ll bite for as little. And his aim, with hoof or teeth, is far better than a horse’s—he’ll seldom miss. Once a mule gets a man to fear him, he can’t be handled safely. But once a mule discovers a packer is reasonable, but doesn’t fear him and will tolerate no foolishness, then he can’t be beat as a trail animal. A mule is far more sure-footed than a horse. He’ll carry a larger load, far easier. Once into tricky predicaments, or having “rolled,” a mule doesn’t worry like a horse, and will come out of danger alive where the situation would kill an average horse. More, a mule-string will not stray from a bell-mare like horses will; and are therefore easier to wrangle, and won’t head “over the mountain,” like homesick horses.
Despite their virtues, mules should be left to the experienced packers, not handled by the average dude-hunter. As Jack Eden, a Selway packer, once told me after giving a certain Theodore mule some enlightening “western grammar” following the mule’s kicking his teeth out, “A mule not only knows what you’re telling him. He knows what you going to say.”
The four basic hitches for packing on a decker saddle with mantas are the express-hitch, the swing-hitch, the barrel-hitch, and the diamond-hitch.
Most any hunter who has rolled a sleeping-bag into a cover and tied it up, has tied an express-hitch. As with the other hitches described, the easiest way to learn it is to study the sketches, and practice with a rope or piece of string upon a package of similar shape.
First the duffel or meat is wrapped into the manta. This is done by placing the load cornerwise upon the center of the square of canvas. The sides of the manta (actually the corners in this position) are lapped over the cargo and folded under. Then the bottom end is similarly folded over and the edges tucked under. Lastly, the top flap is similarly folded. This is important, since the top part of the cargo will ride upward on the horse or mule. In case of rain, this last fold permits drainage down the cargo’s outside.
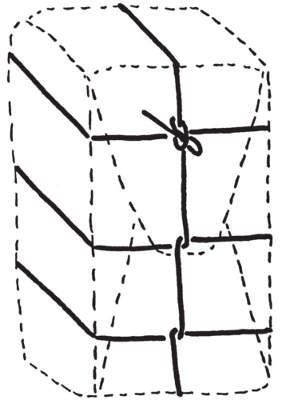
With the manta in place, a lasso-loop is placed around the top of the cargo, at the one-fourth mark. With this tight, the rope is dropped down and a half-hitch thrown around the cargo at the middle. Another half-hitch is similarly thrown around the package at the three-fourths mark downward, as shown. The remaining rope, or running end, is then pulled tight and run downward around the bottom and up the back of the cargo, looping once around each of the three half-hitches as it is brought upward: From there, it goes up over the top of the pack, and is tied down to the first portion of rope leading down from the first loop-with a looped slip-knot.
It takes less time to tie such a hitch than to describe it. There is no better hitch, either for tying a manta around duffel or for wrapping game quarters. The technical name for such wrapping of cargoes into mantas is “lairing up.” The original lair-ropes were 30 feet long. Some packers use ropes of 21-foot length when cargoing meat only. For all bulky duffel, the 30-foot length is better. If the rope happens to be short, two loops around the package will suffice. Many packers use but two loops around the front quarters of game, but as many as four around hind quarters, which are tied the same way.
With the cargoes manta-ed, they are ready to mount upon the saddle. All cargoes of duffel, incidentally, are laired-up before any loading of the animals is done.
When two packers work together, each takes a cargo and “bumps” it into position on the saddle at the same time, quickly lashing it on. Where one packer loads, he lashes the left cargo on first, then the right. This is done as quickly as possible, so that no animal has to stand with a lop-sided load—a sure invitation to trouble with spooky pack animals.
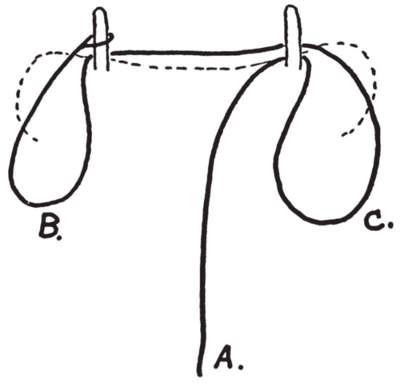
The basic swing-hitch, as shown in the sketches, is simple to throw. The name swing-hitch is a colloquial expression. It is, in reality, the old military cross-tree, or saw-buck hitch. It was originally thrown with sling-ropes. This gave rise to the name “sling-hitch,” which has, through mis-pronunciation and repetition, become “swing-hitch,” in some regions.
To begin this hitch, the lash-rope is tied permanently to the front ring of the decker on the left side, with the lash-rope for the right side similarly tied to the rear loop. The standard length for these ropes is 30 feet each. In cases where this hitch is to be used with a sawbuck saddle, both ropes are left together, in one continuous length of rope—60 feet. The middle is simply double-half-hitched to the front saw-buck, and the right-hand side of the hitch thrown backward, or reversed.
Just prior to loading, a large loop is left in the lash-rope, lengthwise of the saddle. The running-end of the rope is threaded through the iron loop opposite, from the outside, coming back under the lengthwise loop, and drooping loosely to the ground.
With the cargo in position on the saddle, the loop is placed across the upper part of the cargo, approximately one-third the way down, depending upon its size, weight, and how it must be made to balance ultimately with the opposite pack. The rope going downward under the pack is grasped by the packer and pulled very tight. He does this by lifting the cargo with his shoulder, easing it back and forth, and taking up all slack.
With this loop taut, the rope is brought up under the cargo at the center and on up to the cross-loop. There, a portion of the rope marked “B” is looped downward under the cross-loop. It is not pulled through, just looped and drawn tight in a downward heave. With this done, the remaining rope marked “C” is grasped by running the hand under the “B” loop. Another loop marked “C” is then pulled tightly through the “B” loop.
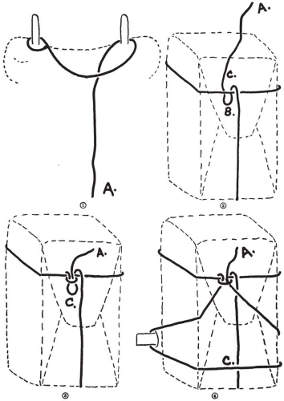
That’s the basic swing-hitch. The load hangs tightly downward upon the rope leading around the cargo’s bottom. The load cannot swing out of line lengthwise because of the first cross-loop—yet the entire cargo can swing freely with the movement of the animal. The hitch will not come untied because of the friction of the loops against the manta when using a more-or-less standard 1/2-inch lash-rope. It has the further virtue of being quickly unhitched in case of a “rolled” animal. One jerk on the running-end of the rope (even after supplementary looping) and the load is dropped from the animal.
This possibility is always present in rough country, despite good trail-animals and expert packing. Only last summer, as one example, our party was fording Green River with a mule-string, when one beast lost its footing, went under and nearly drowned before the packer skillfully snaked the animal out of the river with a lariat from his saddle-horn. Similarly, a spooky trail-animal or the uncertain footing of treacherous mountain switch-backs occasionally causes a pack string to roll. In such cases, rigging and cargoes must come off the animals in a matter of seconds.
To complete the basic swing-hitch, many packers make a loop in one rope-end, and thread the opposite lash-rope through it, cinch it tightly at the top of the saddle between cargoes, and tie with a single looped hitch. If antlers are to be tied on, the remaining rope is used for the purpose.
Still other packers will use the remaining rope to hitch downward over the packs and to the cinch-ring of the saddle, preventing undue “working” of the loads on steep trails.
Other packers, in an effort to stop all unnecessary swinging of the lashed loads, add a length of hardwood slat to each side of the pack saddle. This slat, two inches wide by one inch thick, rides along the outside of the saddle on top of the leather skirts, and with the ends protruding out of leather stoppers. When the basic swing-hitch is thrown, it is further completed by extending the loop “C”, as shown in the sketch, into a large loop which hooks over the ends of the slat and is pulled tight…then the running-ends are tied over the top as explained above.
This arrangement really holds the cargoes down tight. One Chamberlain Basin packer even made his own improvement on this arrangement. To each end of the cinch he attached a metal hook, lacing it on to the cinch-rings. To complete his special hitch, he extended the bottom part of loop “C” down the middle of the cargo; threaded it through the cinch-hook to make another smaller loop, into which he threaded the running-end of the rope, and cinched it tight.
Whatever embellishments are put on the basic hitch, one thing should be remembered: Tie no knots, but rather, make loops which can be untied with a simple jerk on the rope-ends, quite like knitting may be unraveled by a pulling of the yarn thread.
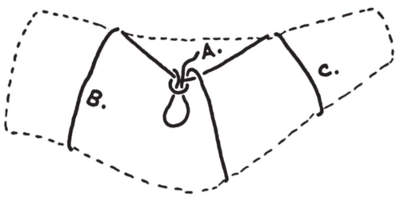
The “barrel-hitch” is useful for lashing on cargoes which have an excessive length-to-thickness ratio, such as hind quarters of game, exceptionally long kitchens, or lengthy bed-rolls.
The same pair of lash-ropes is used in this hitch, as for the swing-hitch. Before lifting the cargo, the ropes are looped through both iron rings of the decker saddle, as shown in the sketch, and with the running-end coming downward between the saddle-loops. When the long cargo is lifted into place, one loop goes around either end and is drawn taut. The running-end of the rope is then brought up from below, around the center of the cargo, and tied with the same loop-hitch as for the swing-hitch. Supplementary hitching may be done, also, as with the swing-hitch.
I have had the hind quarters of a big bull elk ride for seventeen miles in tough mountain country, after being properly lashed on, without once tightening the lash-ropes. As one will quickly find, any slack or stretch in the lash-rope will soon result in a drooping pack, which must be tightened. New rope is an abomination, since, like a fiddle-string, it takes some time to get all the stretch out of it. Wet or frozen rope is similarly hard to use. Most packers go to considerable length to keep all lash-ropes dry.
With any hitch, a perfect balance of the cargoes must be attained. There is no quicker way of crippling an animal’s back than to haul a load which doesn’t perfectly balance. To test for balance, stand behind the loaded animal and gently “rock” the load sideways. If the sway on each side is equal, and the iron ring stays at the top-center of the saddle, then the load balances. Otherwise, the lighter pack must be dropped downward, or the heavy pack boosted higher upon the saddle, and re-lashed. Experienced packers can tell if the load balances, usually, by a preliminary testing at that stage where the lengthwise loop is first drawn tight across the load. This saves considerable untying and re-lashing, later.
The swing-hitch and barrel-hitch may both be used on sawbuck saddles. One difference is that the lash-ropes must go around the X’s, instead of through the iron loops. A bigger difference is that a lash-rope will not slip from an iron loop, even during a spill, but will often let go from around a saw-buck.
The remaining hitch for the beginner to learn is the diamond-hitch.
This hitch has a romantic history. It was likely developed during the period when the old aparejo saddles were being used, and was used extensively upon this type of saddle.
The aparejo pack saddle, itself, has a long colorful history. The Arabs developed it during their nomadic wanderings. The Moors later brought it to Spain; and the Spaniards, in turn, brought it to South America and Mexico during the days of the Spanish conquest.
Later, the Mexicans built the saddle of two materials. In one type, meant for light hauling of bulky articles, they used the fiber of the agave plant. In aparejos meant for hauling mining supplies and other heavy loads, leather and rawhide was used.
Basically, the aparejo saddle consists of two thicknesses of material sewn around the edges. Grass was stuffed between these two layers, through two small hand-holes, for padding between the load and the burro. The rigging consisted of a saddle-blanket, cinch, and wide crupper, or grupera. In a modern pack saddle, this crupper became a breeching, and a breast-strap was also added. The boot-sticks which were gradually added, subsequently became the saddle-bars often used on current saddles.

The old aparejo saddles did service all during the Gold Rush days, the Spanish-American War, and during the settlement of the Southwest.
The Mexicans in some areas use a form of this old saddle even today. As late as 1954, I have seen natives of Old Mexico hauling great loads of fire-wood, and even hay—all lashed onto a tiny burro with this form of saddle. It is said that a Mexican is the best packer in the world; and that with nothing more than burro, saddle, and rope, he can even lash on a load of loose straw and make it ride.
While the modern packer uses improved saddles, the old virtues of the diamond-hitch remain. It is the standard hitch today for completing the loaded packs. A diamond is used to lash down a top-pack upon two cargoes, to anchor heavy antlers, and to lash a canvas covering (protecting the load from wet and raking by branches) onto the otherwise loaded animal.
Top-packs should be avoided whenever possible. Any bulking of the load on top causes it to sway excessively. Only such small items as a sackful of hobbles, small duffel-bags, fishing rods, and similar gear should be top-packed. A diamond-hitch lashes such a completed load down, all the way around.
There are several variations to the diamond-hitch, and ways of tying it. A Canadian outfitter once told me, “There are forty-six ways of tying a diamond-hitch. I can show you one of them.” He demonstrated, and I later learned the hitch by practicing in his cabin with a shoe-lace and a couple of simulated packs.
This hitch is the one most used by packers, and is a variation of the old Oregon diamond-hitch, so named because of its original use in the Oregon Territory. It is simply tied, even by the packer working alone. Its finished appearance represents a three-quarters diamond.
The old military standard, as once used by our own cavalry, was a lash-rope 50 feet long. Most packers use a shorter length. This rope is tied to a ring in the webbed lash-cinch. This cinch, of nearly thirty inches in length, has a large hook at the opposite end.
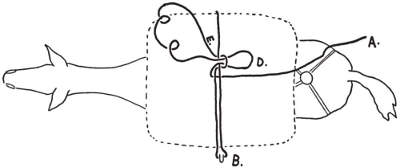
To begin, the packer stands on the loaded animal’s left side. He lays the running-end of the rope lengthwise over the top of the animal, allowing the rope-end to reach approximately to the beast’s tail, and the forward portion extending to the animal’s neck.
Next, the cinch-end of the rope is thrown over the load, and full around the animal at a point just behind the forward cinch of the pack saddle. As the cinch comes down under the beast’s belly, the packer catches it, and hooks the main length of rope through the hook, as shown in the sketch. This first loop around the animal is pulled tight, as indeed are all parts of the hitch as the packer follows the rope around the load on both sides, and finishes tying.
At this stage, the tight rope is kept ahead of the encircling loop. The rope is brought to the saddle-top, and full across the first lengthwise portion terminating at “A”. At this point, the free part is poked in a small loop “C” under the loop encircling the animal.
The next step is to reach under loop “C” from a position towards the rear of the animal, extend the hand through this loop, over the loop encircling the beast, and grasp the free rope at point “D”. Another loop of rope is then pulled through loop “C” as shown. This new “D” loop, pulled to a length of eight inches or so, is left as a loop for the time being.
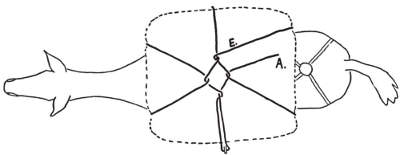
Next, the packer walks around the animal to its right side, and grasps the rope at point “E”. The friction of rope-on-canvas will keep the hitch taut to that point, as he walks around.
With the rope held tightly at point “E”, the packer allows the taut rope to strip through his hand, and places the free portion of rope down around the right-pack at the pack’s rear edge, center. The rope is extended tightly under the pack, follows up the front edge (center), and up to the loop “D” at the top, encircling the pack.
At this point it will be apparent that if the packer pulls on the right-hand portion of loop “D,” he can strip all the loose rope remaining at the front end of the right-hand pack, and which is still in his hand, through, at the top of the animal. With this part of the rope still tight in his hand, he walks around the rear of the animal, and takes the rope on down the front of the left-hand pack, and down under, as with the right-hand pack. When this remaining rope is then brought up along the rear edge, and in the center of the left pack, it becomes the remainder of the rope thrown lengthwise along the beast’s top, or portion “A.”
This remaining rope is pulled tight from a position behind the loaded animal. As this is done, the loops created at the top of the pack spread into four straight lines between the loops, creating the finished “diamond,” from which the hitch gets its name. It’s then tied in a loop-knot.
A fast packer can tie three diamond-hitches in the time it has taken to type these instructions. It is far easier to learn the hitch by studying the sketches, then practicing a half-dozen times, than from the text itself. But the actual tying of a diamond-hitch is simplicity itself. Make the two basic loops, and “follow through.”
My friend Morgan Lake learned to tie a diamond in a unique manner. He came to our house one Sunday just before hunting season, lugged his pack saddle onto the lawn, and asked that I show him how. I did. The next day he rigged up a miniature pack animal on which to practice. It was simply four pencils, two pairs crossed at their tops and tied to a length of doweling. This was his sawbuck saddle, and “horse”—a tiny saw-horse. With strings on the pencils for lash-ropes, and a pair of small paper bags, stuffed, for his packs, he practiced tying a diamond-hitch, as well as the swing-hitch.
Within the week, he was telling me with authority, that “you don’t tie that hitch just right. I’ve found a couple of ways that are better. And I’ve learned some additions to your old swing-hitch, too.”
A couple of weeks later, he and his party trucked their own stock into central Idaho, bagged their elk, and packed them out without assistance or difficulty.
The best way to memorize these basic hitches is to practice “throwing” them upon a small dummy. A simple, adequate makeshift can be made in two minutes with nothing more than a length of 2×4, two eye-screws, a couple of candy-bags the size of a fist and stuffed with paper, and three shoe-laces.
The eye-screws are set into the top edge of the 2×4, three inches apart, making the “saddle, loops, and mule.” The stuffed bags are the manta-ed cargoes. A fistful of paper, crushed into a roll, is the top-pack. The shoe-laces are the lash-ropes. Tie a loop at the end of the diamond-hitch “rope,” to simulate the cinchhook; set the scantling in such a position that it can be “lashed” all the way around; and have at it. The third time you can correctly tie all hitches, you’re a veteran.
Besides the basic hitches, there are special lashings used to accommodate unusual packages of gear. Two items requiring special attention are the heavy antlers of moose and elk; and such items as bulk-grain in sacks, which will shift its position within the hitch due to trail-movement.
Most packers lash the antlers of an animal on as a top-pack, and with the various rope-segments of the diamond-hitch wrapped around the antler-beams as it is being thrown. When tightened, this hitch cinches the skull-plate tightly down, and bends the antler-tips rear-ward, so that the points ride down alongside the animal’s spine. The big consideration in packing antlers, is to make everlastingly sure that they will not gouge the pack animal, regardless of its movements on the trail. Massive antlers won’t. Small antlers will.
A good way for the beginning packer, or the hunter who finds it necessary to pack his own antlers, is to simply tie the skull-plate down at the forward end of the top-pack (if any), then bend the antler-tips backward parallel with the spine of the pack animal. Then place a length of heavy willow, or similar 2-inch sapling, across the animal, and just under the rear-ward portion of the antlers. This stick should be just long enough to go under each antler, without protruding. Otherwise, the ends will catch trees along the trail.
The length of stick rides firmly upon the top of the packs, across them, and is tied at each end to the opposite antler-beams. This keeps the points from dropping down enough to gouge the pack beast. It’s a simple, home-made arrangement, but it will work.
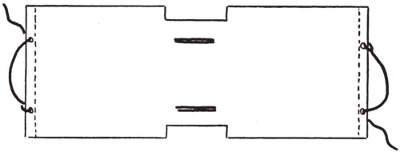
One of the simplest rigs I’ve ever seen to haul sacked oats, for horse-feed, without bother, is made from a rectangular piece of 24-ounce canvas, measuring 8 by 3 feet. This canvas is, when being shaped up, laid across the pack saddle, with the short dimension running lengthwise of the animal. After being centered on the saddle, the places where the sawbucks, or iron loops, are located, are marked; and a slit, re-inforced with leather binding, is cut for each. That is so the canvas will fit snugly down upon the saddle, not ride high upon the loops.
Also, at the exact center, ahead and behind the loop-slits, the canvas is further cut away by removing rectangles of canvas measuring 6 inches by 18 inches from both the forward edge, and the rear edge. The 18-inch dimension is across the saddle, or lengthwise of the canvas. These small “blocks” of canvas are cut away to keep the forward edge from bulking up at the animal’s withers, and also at the rear of the saddle.
This canvas wrap is finished by hemming all the way around, and lastly, placing two heavy grommets in each end (of the 3-foot width), and approximately 18 inches apart. If sawbuck saddles are used, a 1/2-inch rope “bail” is tied into these grommets.
In use, the canvas is thrown over the saddle, with the slits fitted down over the bucks or loops. A sack of bulk grain is lifted onto either side of the saddle, on top of the canvas. The ends of the wrap are then lifted up and around the grain-sack to the top of the saddle; and the rope bail simply looped over the pair of sawbucks on either side. If deckers saddles are used, these ropes are tied only at one end. The other end is threaded through the saddle-loops, and the free end tied to the other grommet.
Sacks of grain are, of course, balanced in advance of being loaded. When simply wrapped up in this canvas sling, and lashed with a diamond-hitch, either with or without a top-pack, bulk-grain will ride without any further attention. I’ve found this simple rig handy also for hauling long bed-rolls. One pair of heavy rolls, or even two pairs of smaller rolls, will ride upon the rig all day, without trouble, assuming they are balanced in advance of being loaded.
One of the best ways for a beginner to understand the basic principles of packing, is to study the tree of a pack saddle. Two small wooden supports, over a blanket or two, are all that stand between a heavy load, and the ruination of a pack animal’s back. From such a study, it should be apparent that the main considerations are to have any load balance perfectly as it swings in a crosswise direction across the animal; and, further, to have such a balance existing also as between the forward and rear ends of the load—to prevent the saddle’s undue biting in at either the shoulders or kidneys.
Once this is understood, the fundamentals of cargoing up all kinds of duffel become more readily appreciated.
Packers, like any other specialists, have a fierce, professional pride in their work. They have, too, a disdain amounting almost to contempt for any tenderfoot who packs a horse or mule with no knowledge of the skill involved. They snort to high Heaven when some dude comes into camp, toting his “button-holed” buck deer on some rented steed. They razz contemporaries unmercifully should they come in off the trail with packs drooping, and mantas flapping. And, with small exception, a good packer will, the last quarter-mile before he reaches base-camp or any other place where people will watch, see that all packs are tight and riding high and ship-shape.
Occasionally a hunter, trying to do his own packing without knowing how, will drape everything in the book upon an innocent riding-horse, and stock-saddle—tents, stoves, sacks of grub, hay, even loose frying-pans. Everything he needs at spike-camp must go, of course; and usually it’s loaded upon the staggering beast in the same order in which the poor guy throws it from his pickup. He simply starts with a hundred feet of rope, and knots all duffel on as it comes, using every knot in the Boy Scout Handbook. When he runs out of duffel and rope, he’s ready for the hills.
The resultant horse looks quite like an over-burdened Christmas tree, lop-sided, of course; and if the poor beast ever does make it to camp, he’s certain to have a crippled back. Or worse.
In Idaho’s Salmon River country, the guides and packers have a special, contemptuous name for such “packing.” They call such lashing on a “Gilligan-hitch.”
“Well, Buck,” they’ll wink, “here comes another Gilligan; must be a horse under it somewhere.”
The name evidently came from some character of that name, equipped with more duffel and optimism than know-how.
Click here to purchase Hunting Our Biggest Game in paperback
