The following information comes from Manual of Police Revolver Shooting by R. M. Bair. Manual of Police Revolver Instruction is also available to purchase in print.
The second principle in revolver shooting to be considered is Grip. The officer should master the proper Grip with both the right and left hand, for occasion may arise when it would be impossible for him to fire with the right hand owing to wound or injury to the hand or arm. Without this ability to fire ambidextrously, he would only be half efficient, and would be placed at a disadvantage when firing from the corner of a building.
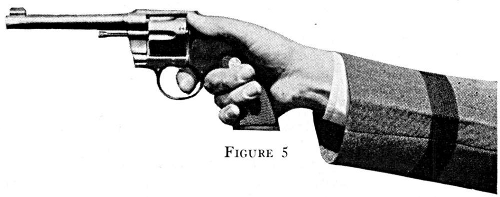
When firing with the right hand, grip the stocks with the last three fingers and the back of the palm, finger-tips not touching the stocks, thumb placed on the latch and against the left side of the frame, beside the hammer, thumb-tip pointing upward and the first or trigger-finger placed on the trigger, wherever it touches. Fig. 5.
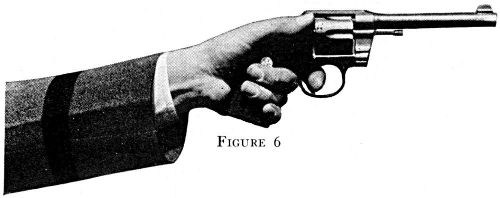
When firing with the left hand, grip the stocks with the last three fingers and the back of the palm, finger-tips not touching the stocks, thumb placed on the right side of the frame, following the contour of the top of the frame beside the hammer, thumb-tip pointing upward and the first or trigger-finger placed on the trigger wherever it touches. Fig. 6. Care should be taken that the trigger-finger is never placed high on the trigger, for the reason that the trigger pull will be increased. The trigger-finger should be placed on the rounded portion of the trigger provided for it.
The Grip should always be high on the stocks so the back of the hammer, when cocked, will touch the top part of the hand between the trigger-finger and thumb. This will cause the barrel of the revolver to point straight as naturally as pointing the finger, and the barrel will be in prolongation with the arm that is holding the revolver. It will also help to maintain the same Grip which is very important. If the officer were to change the Grip with each string of shots, it would change the Group on the target each time. A low Grip is hard to keep uniform for each shot and will cause wild shots on the target, for the reason that when recoil takes place, the muzzle of the revolver rises, causing the stocks to slip in the gripping hand after each shot is fired.
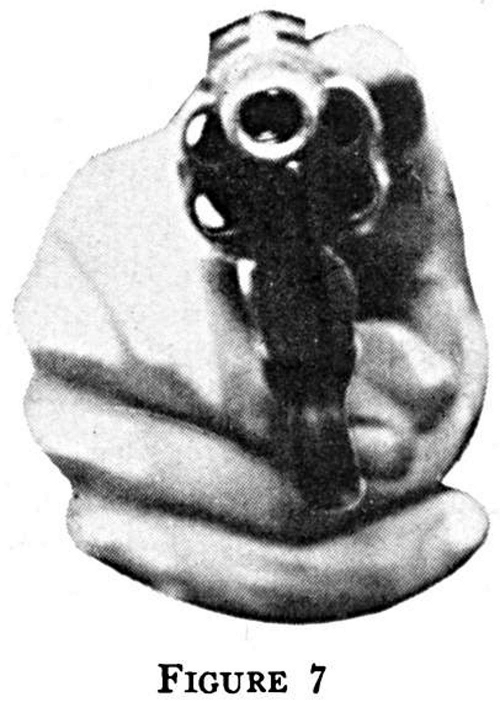
Another reason for gripping the stocks high, is to use the thumb-tip as a sight for Snap shooting or shooting in the dark, when it would be impossible to see the iron sights of the revolver. If the proper grip has been taken, it will bring the thumb-tip about level with the top of the rear sight, (the thumb-nail can be seen when it is dark, with the arm extended) and with the barrel pointing straight, it is possible to hit a man-sized target as far as the target is visible up to 50 yards or more. Fig. 7. This method of firing may be used with either hand and is very effective.
There are several DON’TS concerning Grip and care must be taken that they are avoided when firing, even though the hand has been placed properly on the stocks of the revolver.
- Finger-tips should never touch the stocks.
- Do not Grip too tightly.
- The arm muscles should never be tensed or strained.
These mistakes in gripping will cause Muzzle Wabble resulting in wild shots. A large number of persons, when asked to fire a revolver, will say they are nervous. In most cases it is not nervousness but rather Muzzle Wabble.
For Slow Fire, the revolver should be gripped only tight enough to Hold, keeping the sights in alignment until the shot is fired by SQUEEZING THE TRIGGER. For Timed and Rapid Fire the grip is slightly tighter so that the same grip is maintained for the string of shots. The arm should be fully extended from the body at the time of sighting and firing but there should be no stiffness of the muscles.
The revolver should be fired single action, that is, to cock the hammer between each shot. The proper method of cocking the hammer with the right hand is to turn the muzzle to the right, cock the hammer with the thumb, close the gripping hand thus swinging the muzzle back to the left and bring the sights into alignment for the next shot, being sure to release the finger tips from the stocks before the shot is fired. To cock the hammer if firing with the left hand the method is the same except the muzzle is turned to the left when cocking with the thumb of the left hand.
Care must be taken at the time of cocking the hammer, that the wrist is not turned or rolled. Only the muzzle of the revolver is turned to the right or left as the case may be, but the sights of the revolver are kept in the vertical position when the revolver is turned.
Firing double action is to cock the hammer by increasing the pressure of the trigger-finger on the trigger, which lifts the hammer until it is released by the end of the strut. Fig. 8. Firing double action increases the trigger pull many times, for the reason that sufficient trigger pressure is required to depress the main spring, lift the rebound lever and hand that engages the ratchet on the cylinder, revolving the cylinder for the next shot and lifting the hammer. The revolver should only be fired by this method in emergency, when the hammer cannot be cocked by the thumb or when in very close proximity to the adversary, such as a hand to hand scuffle. At greater distances, firing double action will cause muzzle wabble, flinching and wild shots. It is impossible to keep the sights in proper alignment when the target is at greater distances.

When firing Timed or Rapid Fire by the single action method, care should be taken to release the trigger after each shot has been fired, otherwise, after the hammer has been cocked for the second shot and the trigger SQUEEZED, the hammer will again fall on the last cartridge fired. At the time the trigger has been released after a shot has been fired, the rebound lever forces the trigger forward and allows the hand to drop so that it will engage the ratchet on the cylinder and when the hammer is again cocked it will turn the cylinder enough to bring the next cartridge primer into alignment with the firing-pin hole.
Revolver Shooting Grip Quiz
- Describe the proper Grip when firing with the (a) Right hand. (b) Left hand.
- Why should the finger-tips never touch the stocks at the time of sighting and firing a revolver?
- Why should you never Grip too tightly at the time of sighting or firing a revolver?
- How tightly should the stocks be gripped at the time of firing?
- What is the advantage of placing the thumb high along the side of the frame when firing?
- Should the Grip be high or low on the stocks at the time of firing?
- How should the hammer be cocked, between shots, when firing with the (a) Right hand? (b) Left hand?
- Why should the arm muscles never be strained or rigid at the time of sighting and firing a revolver?
- Why should the trigger-finger never be placed high on the trigger at the time of firing?
Click here to purchase Manual of Police Revolver Instruction in paperback
