The following information comes from Manual of Police Revolver Shooting by R. M. Bair. Manual of Police Revolver Instruction is also available to purchase in print.
The third Principle to be thoroughly mastered by the officer is Sighting, which will require patience and honest effort in order that sighting problems may be worked out instantly at the time of firing. Without a thorough knowledge of sight alignment with relation to the target at the time the shot is fired, and the corresponding location of the shot on the target, the officer will never be able to account for wild shots.
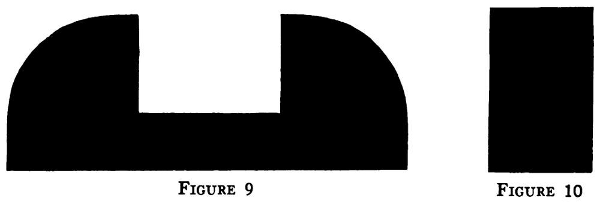
The sights referred to in this manual are the Patridge and the Blade fixed types and are not adjustable, that is, they are part of the barrel and frame of the revolver and cannot be adjusted for windage or elevation. These types are used almost entirely by Police Departments, and have proven the most practical for holster or pocket use. The only difference between the two types is that the blade type front sight is thinner, and the rear sight notch is narrower. The Patridge front sight and rear sight notch are both wider, making it easier to bring them into alignment quickly, and helps to overcome a natural tendency to cant the revolver when sighting. Figs. 9 and 10.
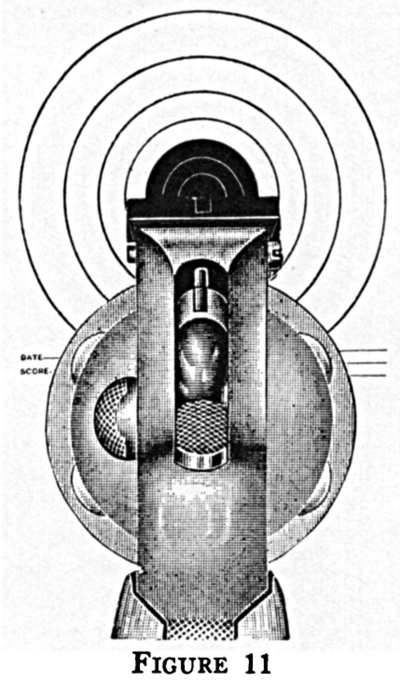
The reason for using the bottom edge of the Bull’s-eye, or 6 o’clock, at the bottom edge of the 8 ring on the Standard American Target, is always to take the same aiming point. It also makes it possible to see the lines of light on either side of the front sight in the rear sight notch more clearly than if you used an aiming point inside the black portion of the target. The iron sights on the revolver are black and in certain light do not stand out distinctly if aimed at the black portion of the target, or what is known as a Deep black hold. However, some shooters prefer the deep black hold as shown in Fig. 11, especially if using a revolver equipped with the Patridge type sights.
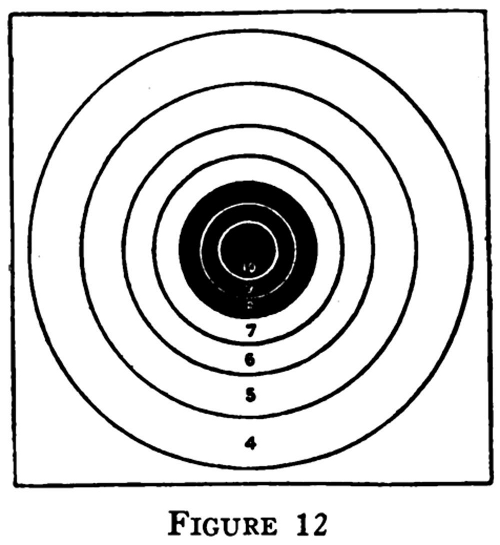
The Standard American Target is used almost entirely by Police Departments for training purposes or quarterly firing, for the reason that the inside diameter of the 5 ring is approximately the size of a man’s body. It is used in most competitive matches, including the National Matches. The diameters of the rings into which the target is divided are as follows:
10 ring — 3.36 inches
9 ring — 5.54 inches
8 ring — 8.00 inches
7 ring — 11.00 inches
6 ring — 14.8 inches
5 ring — 19.68 inches
The rest of the target, 24 x 24 inches, count a value of 4. Fig. 12.
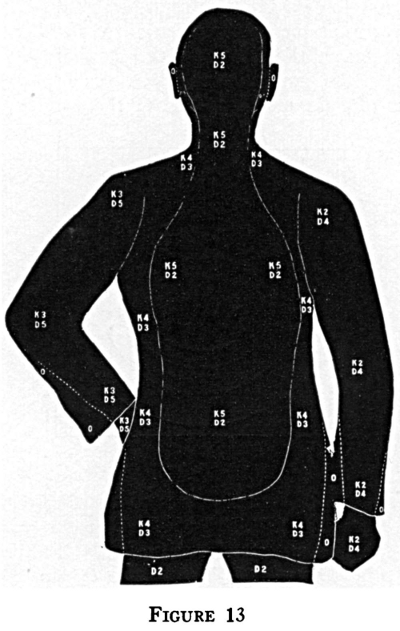
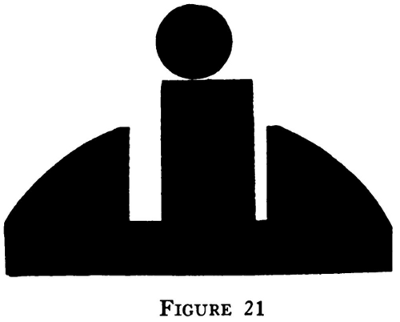
Another very good target that is used by many Police Departments for rapid fire is the Colt’s Police Silhouette Target. Fig. 13.
The location of a shot on the target is read by the clock method and the numbered rings on the target. That is, you read the face of the target the same as you read the time on the dial of a clock. All targets are composed of numbered rings that increase in diameter from the center of the target to the outside margin. Figs. 14 and 15.

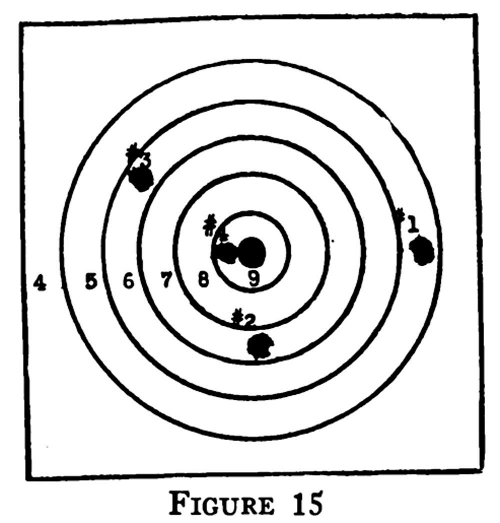
Figure 15 shows the location of four shots on the target as follows:
Number one shot strikes the 5 ring at 3 o’clock.
Number two shot strikes the 7 ring at 6 o’clock.
Number three shot strikes the 6 ring at 10 o’clock.
Number four shot strikes the 9 ring at 9 o’clock.
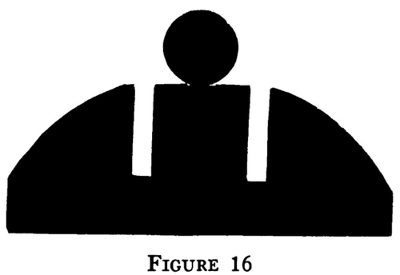
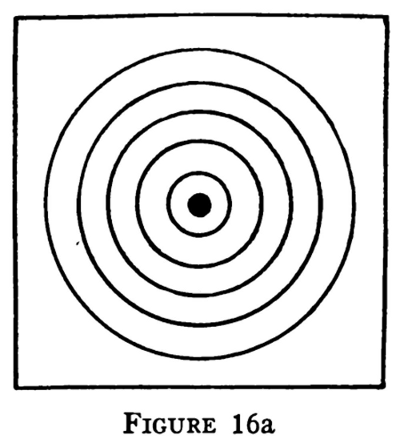
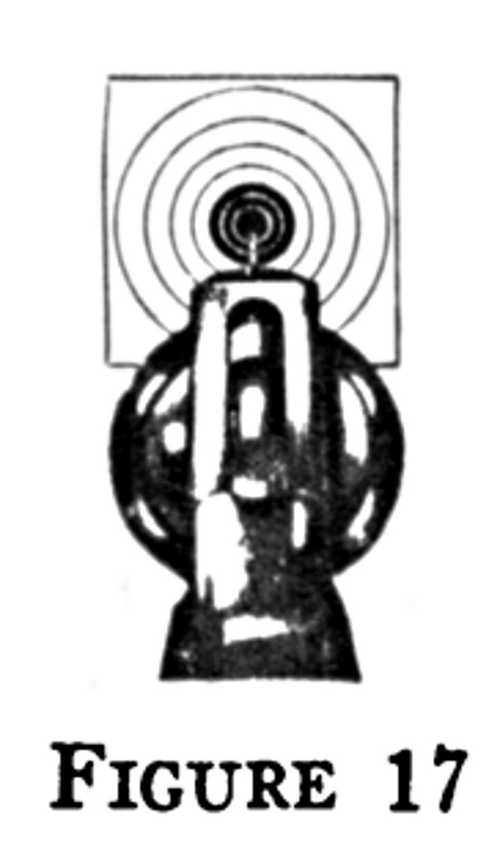
The proper alignment of sights at the time of firing or at the time the firing pin strikes the primer of the cartridge and before the revolver goes into recoil, is to have the top of the front sight level with the top of the rear sight, and an equal amount of light on either side of the front sight in the rear sight notch. Figs. 16 and 17. The bull’s-eye or black portion of the target should appear to be resting on the top of the front sight, which will make the aiming point 6 o’clock at the bottom edge of the 8 ring or 6 o’clock black, on the Standard American Target. Figs. 12, 16, 16a and 17.
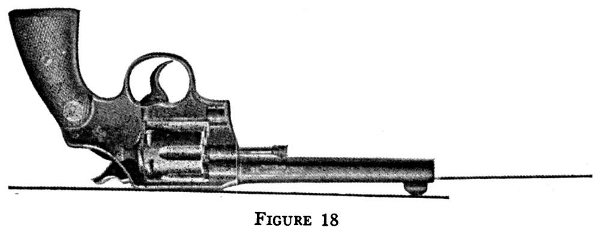
When sighting, no allowance should be made on the target for recoil when the shot is fired, as the factory has already taken care of this allowance by adjusting the height of the front sight in relation to the rear sight, to make provision for the slight upward movement of the barrel, from the time the ball starts from the chamber in the cylinder until it leaves the muzzle of the barrel. This adjustment of sights may be seen by inverting the revolver and resting the top of the front and rear sights on a level surface. It will be seen that the barrel is then pointing upward. If a revolver were clamped in a fixed rest with the sights in perfect alignment on a target at 25 yards, and fired, it would be found that the ball strikes 2 1/2 inches below the center of the target or at the point the revolver was sighted, which shows the adjustment the factory has made in the alignment of sights to compensate for recoil at the time of firing. Fig. 18.
(Regarding adjustable sights; if the officer should happen to be using a target revolver with adjustable sights and wishes to move the sights to change the group on the target, a very good rule to remember is as follows:)
Whatever you do to the rear sight, you do to the bullet, that is if you were to move the rear sight to the right, the bullet will go to the right on the target.
Whatever you do to the front sight, will be opposite from where the bullet strikes the target, that is, if you were to lower the front sight, the bullet will strike high on the target.
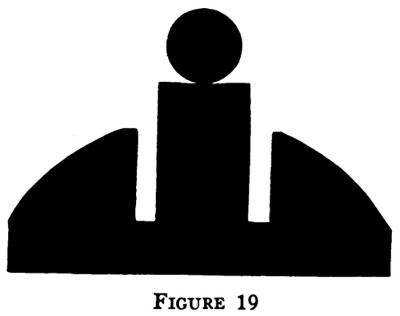
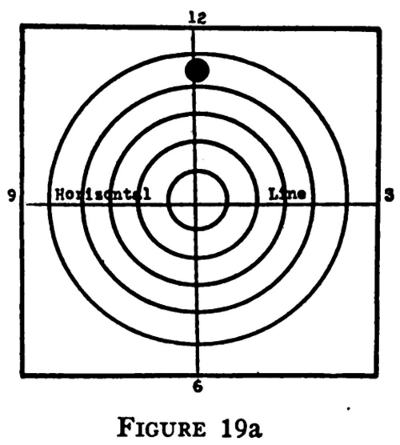
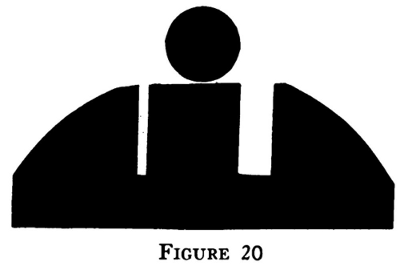
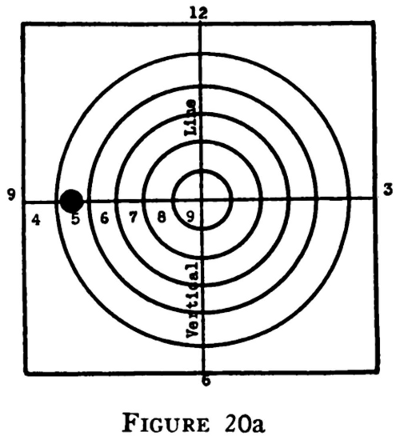
At the time of sighting, the height of the front sight in relation to the height of the rear sight determines whether a shot will strike above or below the horizontal line drawn across the center of the target, from 9 o’clock to 3 o’clock. Figs. 19 and 19a. Any variation of light on either side of the front sight, in the rear sight notch, will determine whether a shot strikes to the right or left of the vertical line drawn up through the target from 6 o’clock to 12 o’clock. Figs. 20 and 20a.
Example No. 1.—If a shot strikes the target in the 5 ring at 12 o’clock, it shows that the top of the front sight was higher than the top of the rear sight, but that there was an equal amount of light on either side of the front sight, in the rear sight notch. Figs. 19 and 19a.
In this case, the top of the front sight, being higher than the top of the rear sight, caused the shot to strike above horizontal line drawn across the target from 9 o’clock to 3 o’clock, but the lines of light on either side of the front sight, in the rear sight notch being equal, caused the shot to strike on the vertical line drawn up through the target from 6 o’clock to 12 o’clock.
Example No. 2.—If a shot strikes the target in the 5 ring at 9 o’clock, it shows that the top of the front sight was level with the top of the rear sight, but that there was too much light on the right side of the front sight, in the rear sight notch. Figs. 20 and 20a.
In this case, the top of the front sight was level with the top of the rear sight, causing the shot to strike on the horizontal line drawn across the target from 9 o’clock to 3 o’clock, but there was too much light on the right side of the front sight, in the rear sight notch, causing the shot to strike on the left of the vertical line drawn up through the target from 6 o’clock to 12 o’clock.
Example No. 3.—In figure 21a, we have a shot striking the 4 area at 1 o’clock. In this case the top of the front sight was higher than the top of the rear sight, and there was too much light on the left side of the front sight, in the rear sight notch.
Any shots striking to the right or left of the vertical line drawn up through the target, from 6 o’clock to 12 o’clock, will be known as a sighting problem in WINDAGE. Any shots striking the target above or below the horizontal line drawn across the target from 9 o’clock to 3 o’clock, will be known as a sighting problem in ELEVATION.
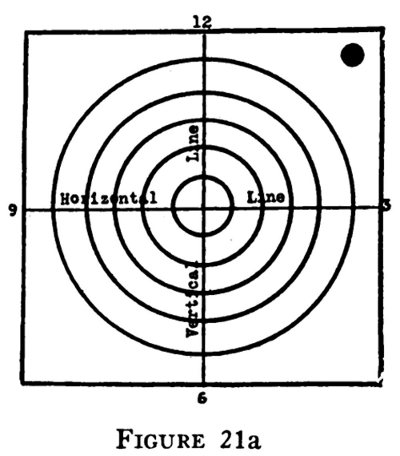
In example number 3, we have two problems in sight adjustment, windage and elevation. The top of the front sight being higher than the top of the rear sight, caused the shot to strike above the horizontal line, drawn across the target from 9 o’clock to 3 o’clock. There was too much light on the left side of the front sight, in the rear sight notch, causing the shot to strike the target to the right of the vertical line, drawn up through the target from 6 o’clock to 12 o’clock.
Care should be taken to see that the revolver is never CANTED at the time of firing. This will cause the shots to strike high or low, right or left of the center of the target, depending upon the variation of sights in their alignment at the time of firing along with the degree to which the revolver is canted. Figs. 22, 22a, 23, 23a.

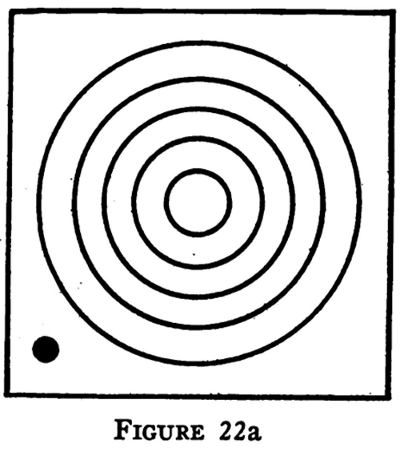

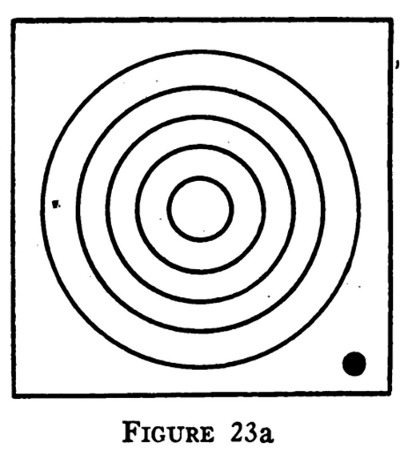
THE REVOLVER SHOULD ALWAYS BE HELD SO THAT THE SIGHTS ARE IN A VERTICAL POSITION AT THE TIME OF FIRING. Figs. 16, 16a and 17.
After the officer has mastered sight alignment and the corresponding location of the shot on the target, he should be able to CALL the location of the shot on the target as soon as the shot is fired, even though he is too far from the target to see where it strikes. The ability to call his shots, as he fires them, is accomplished by seeing the alignment of sights at the time the hammer is released. There is a very short interval of time between the time the hammer is released and before the firing pin strikes the primer of the cartridge, so that during this interval of time, he should be able to get a picture of the alignment of his sights and their relation with the target. It is very important that the officer be able to call the location of his shots, for if he closes his eyes at the time of firing, his knowledge of sight alignment is useless to him, he will never be able to account for wild shots, and there will be a great tendency for him to PULL THE TRIGGER.
It is necessary that the officer learns quickly to sight the revolver with both eyes open, using the master eye to do the sighting; this is known as BINOCULAR SHOOTING. Nearly everyone has a master eye, that is, one eye is usually stronger than the other. (In most cases it is the right eye.) To determine which is the master eye, point your finger at an object on the wall, keeping both eyes open. If you see two fingers and find that one appears more distinct than the other and is pointing directly at the object, the finger that appears more distinct is pointed by the master eye.
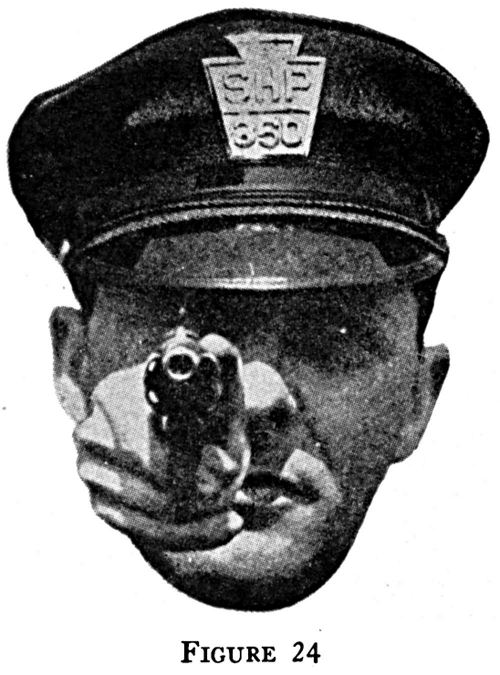
If the officer were pointing at a building or an object that happened to be lying on the floor, he would not close one eye, but would point with both eyes open. The same method should be applied when sighting and firing a revolver. Fig. 24.
It is of importance to the officer to keep both eyes open at the time of sighting and firing a revolver, in order to eliminate the following handicaps:
- If one eye is closed at the time of sighting and firing, the officer will lose the vision to the left of him, if he were sighting with the right eye. This would be a serious matter to the officer, if he had to cover more than one person at one time, such as a number of persons in a room or during a riot.
- Closing one eye will cause squinting with the other eye and in a very short time will develop eye strain.
- Closing one eye will exaggerate any movement of the sights while sighting the revolver, which will have a tendency to cause jerking, yanking and pulling the trigger, by trying to get the shot off the instant the sights appear in the proper alignment with the target.
- By closing one eye, distances cannot be judged quickly and the target will not appear as distinct as when both eyes are open.
- When one eye is closed, the sights will very often appear fuzzy, caused by eye strain.
Learning to shoot with both eyes open may be accomplished quickly by practicing the following simple methods:
Example No. 1.—Focus your eyes on a small object on the wall and then extend either arm fully with the thumb-tip pointing upward. Bring the tip of the thumbnail in line with the bottom of the object, by looking over the thumb-tip, and if you have been focusing your vision on the object, you will find that it is easy to see distinctly both the thumb-tip and the object and their relation, one with the other.
Example No. 2.—Now focus your eyes on the tip of the thumbnail and try to align it with the bottom edge of the same object. You will find that the object appears fuzzy, has a tendency to appear as though it were moving or two objects appear instead of one. For these reasons, always focus your eyes on the target or the object you intend to shoot at and then bring the sights into alignment. Always look over the sights and do not try to look at them or through them. Figs. 11 and 17.
Example No. 3.—Point the revolver at the target and bring the sights into alignment by closing one eye. (We will assume the left eye is closed and the sighting will be done with the right eye.) Now is the time to slowly SQUEEZE the trigger, and as you SQUEEZE, slowly open the left eye so that when the hammer falls, you have both eyes open. You can do this also by pointing the trigger finger at an object and slowly opening the left eye.
The eye that is the master eye, should do the sighting when firing with either hand. If you are firing with the right hand and the right eye happens to be the master eye, the revolver will be in prolongation with the right arm and eye. But if firing with the left hand and the right eye is the master eye, it will be necessary to have a slight bend in the wrist with the left arm extended to bring the sights into alignment with the eye and the target.
Revolver Sighting Quiz
- What is the proper alignment of sights at the time of firing a revolver?
- Why should the revolver never be canted at the time of firing?
- Why should you always cock the revolver, between shots, when firing slow, timed or rapid fire?
- Describe the alignment of sights that would cause shots to strike the target as follows: (a) The 5 ring at 5 o’clock. (b) The 6 ring at 9 o’clock. (c) The 8 ring at 11 o’clock. (d) The 7 ring at 8 o’clock.
- By what method do you read the location of a shot on the target?
- If you were too far from a target to see where a shot strikes (a) Could you call its location? (b) By what method?
- How would you sight a revolver at night to hit a man-sized target at fifty yards?
- Should you sight, with one eye closed or both eyes open?
- Give three reasons for sighting with both eyes open.
- Should the eyes be focused on the target or sights at the time of firing?
- What is the difference between the blade and Patridge type sights?
- Why is the Standard American Target used for Police instruction?
- Why should no allowance be made for recoil at the time of firing a revolver?
- What rule should be remembered when adjusting movable sights on a revolver?
- What is meant by Binocular shooting?
- By what methods should you determine which is the master eye?
Click here to purchase Manual of Police Revolver Instruction in paperback
