The following information comes from Manual of Police Revolver Shooting by R. M. Bair. Manual of Police Revolver Instruction is also available to purchase in print.
Be Sure the Revolver is Unloaded
After having studied and practiced the principles of revolver shooting as suggested in the several chapters and before going on the range to fire his revolver, the officer should be ready to practice DRY SHOOTING. That is, to fire the empty revolver at a target either on the range or in a room that is well lighted, placing a reduced target on the wall and snapping dry to see how well he has mastered the six principles and his ability to carry them out in their proper order after the command FIRE (which he should give himself) from position to squeezing the trigger, and until each shot is fired.
It is a very good idea for two officers to study the manual of revolver shooting and start their revolver training together, so that one may coach the other during dry shooting and on the range. This method will develop their skill more rapidly, for the officer acting as coach will be able to see mistakes made by the officer that is shooting and make the proper corrections.
The officer should first practice drawing the revolver from the holster with the right hand, firing one dry shot at the target and then passing the revolver to the left hand and fire the second shot, being careful to assume the proper position in each case and to see that the proper grip has been taken. He should continue this practice with the empty revolver until it feels perfectly natural in either hand, with looking to see that he has taken the proper grip. Should emergency arise, be will then be able to draw quickly, knowing the barrel of the revolver is pointing straight (as naturally as he would point his finger) by the feel of the revolver in his hand. See Figs. 5, 6 and 7.
The officer should start his drawing practice by being slow and deliberate with each movement, from the time of drawing the revolver from the holster until the shot is fired. He will have to guard against being over anxious to attain speed while learning to draw, for this will be developed as he continues his practice in the methods suggested.
After drawing the revolver from the holster, the officer should never raise the revolver over his head before bringing the sights into alignment with the target. This is a lot of WILD WEST HOKUM, and if his adversary were a good pistol or revolver shot it would be entirely possible for him to fire two shots at the officer before he could bring his sights into alignment.
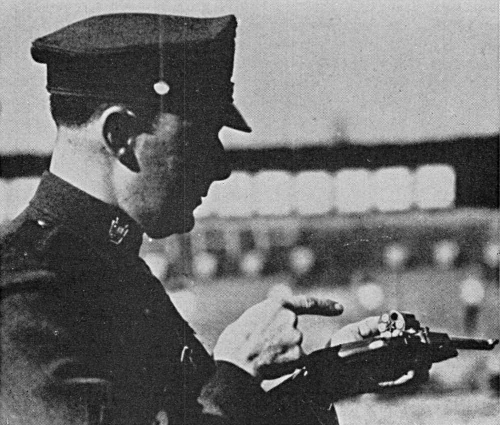
Always draw the revolver from the holster, take the proper grip by the feel of the revolver in the hand (in emergency firing using the thumb-tip as a sight) and bring the sights or thumb-tip into alignment with the target or adversary by the shortest possible route. This is accomplished by extending the arm fully, in a natural motion toward the object he intends to shoot, as naturally as pointing his finger at the same object. The trigger-finger should never be placed on the trigger while drawing the revolver from the holster, for if the revolver were loaded and happened to stick in the holster, it is entirely possible the officer might shoot himself.
At the command FIRE the officer should now be able to carry out the first five principles of revolver shooting in about the count of ONE and as a mechanical operation. Any thought in the matter should be by the sub-conscious mind, which allows him to give all his attention to the sixth and most important principle, trigger squeeze.
When dry shooting, the officer should never hold longer than the time required to squeeze the shot off. He should avoid the bad habit of holding too long and freezing, which is only another form of flinching or being afraid to squeeze the trigger. If he will concentrate on squeezing quickly and with steady pressure as soon as the sights come into alignment, it will help him greatly with timed and rapid-fire shooting. Dry shooting should be confined entirely to slow fire, until he has learned to co-ordinate the trigger squeeze with the alignment of sights on the target until the shot is fired, before attempting to fire timed and rapid fire.
The officer should always align the sights with both eyes open, being sure to see the alignment at the time the hammer falls, call the location of the shot on the target and in dry shooting continue to hold and sight several seconds after the hammer falls. This will help him to overcome being jumpy on the range. Care must be taken to see that the thumb is never placed over the hammer slot (this mistake is very often made by a novice shooter as he applies pressure with the thumb to the side of the frame) as it retards the fall of the hammer, causing a mis-fire. The thumb is placed AGAINST THE FRAME BESIDE THE HAMMER and not on the top of the frame over the hammer-slot.
The next step in dry shooting is to fire five shots with the right hand and alternate with five shots with the left hand. (Learn to count your shots as you fire them, this is important when firing timed and rapid fire.) Continue this alternate firing until you have fired fifty shots with each hand. At first the arm and back muscles will become tired and there will be a tendency to become unsteady, but keep up this practice each day and in a short time, you will be able to hold steady and with ease during each string as the muscles become developed.
In timed and rapid fire practice or shooting, care must be taken to avoid becoming jumpy and fighting time, after the command FIRE is given by the Range Officer. Sometimes the fact of a stop watch in the hands of the Range Officer will bring on a case of buck fever and nerves with some shooters, only because they have not trained themselves for this course of fire.
The first requisite of a good timed or rapid-fire shooter is regular CADENCE in his firing, that is, shots being fired at regular intervals during the time allotted for the string, instead of taking six seconds for one shot and two seconds for the next (which is a sure indication of fighting time and being jumpy) the good timed and rapid-fire shooter will fire a shot each four seconds in twenty-second or timed fire, and fire a shot each two seconds in ten-second or rapid fire. The proper method of developing perfect cadence in timed and rapid fire is for the shooter to count for each shot. When he is on the firing line ready for a timed or rapid fire string, he will be standing at raised pistol with the hammer cocked. At the time the Range Officer gives the command FIRE he should start counting (but not too fast) as follows:
- TIMED FIRE, 20 seconds for 5 shots.
At the command FIRE given by the Range Officer the shooter starts counting to himself: One thousand, two thousand, three thousand, four thousand, for each shot. This will give him plenty of time to cock the revolver, align the sights and squeeze the trigger without becoming jumpy or fighting time. Care will have to be taken so that the trigger is not pulled at the end of counting four thousand, but rather he should practice trigger squeeze until the shot will be fired approximately at this time. Practice with a stop watch will soon teach the officer how fast to count.
- TIMED or RAPID FIRE, 15 seconds for 5 shots.
The procedure is the same as for twenty-second fire except the count is: One thousand, two thousand, three thousand, for each shot.
- RAPID or QUICK FIRE, 10 seconds for 5 shots.
Count: One thousand, two thousand, for each shot.
If the officer masters this method of counting in his dry shooting, he will have no difficulty on the range with timed and rapid fire, and it will teach him the proper cadence of firing. A string of shots is any number of shots fired in succession without re-loading, usually five (5) shots constitute a string and two strings constitute a score.

Dry Firing Quiz
- What is the importance of dry shooting?
- What is meant by firing single action?
- What is the best method of learning to fire timed and rapid strings?
- What is meant by cadence?
- What is meant by firing double action?
- Under what conditions should the officer fire double action?
- How many seconds are allowed for each shot in timed fire?
- How many seconds are allowed for a string of 5 shots in rapid fire?
- What is meant by fighting time?
- How may the officer be sure he has taken the right grip without looking at the revolver in his hand?
- How should the revolver point after the officer has taken the proper grip?
- How should the officer start his drawing and dry firing practice?
- After the revolver has been drawn from the holster, why should the officer never raise it higher than is required to bring the sights into alignment with the target?
- How should the officer carry out the first five principles of revolver shooting, after he has had sufficient practice in dry shooting?
- How may the officer overcome being jumpy during timed and rapid fire when on the range?
- Why should the officer be very careful to never place the thumb over the hammer slot at the time of firing?
- How can the officer overcome the tendency of being unsteady at the time of firing?
- What method should be used to develop perfect cadence?
- How should the officer count for a string of 20-second timed fire?
- How many shots usually constitute a string of shots?
Click here to purchase Manual of Police Revolver Instruction in paperback
